Coastal Christmas TV Tray Makeover
Trade your snow shoes and gloves for flip-flops and sunscreen! Let’s celebrate Christmas on the beach with an adorable Coastal Christmas TV Tray Makeover sponsored by Dixie Belle Paint Company.
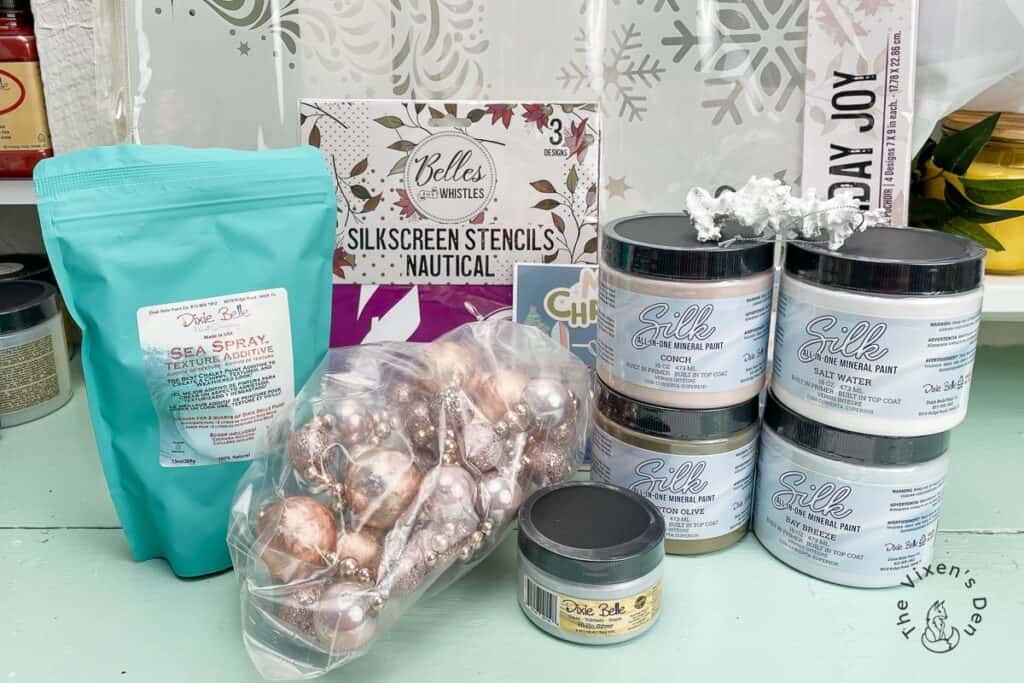
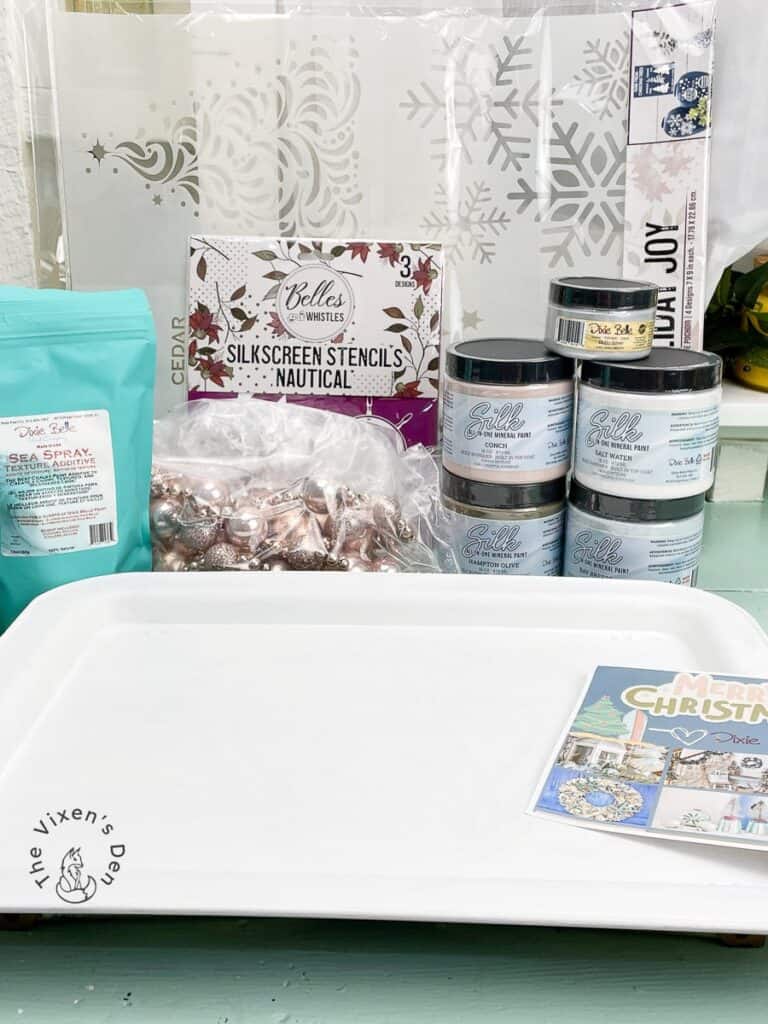
I was so excited to be accepted for Dixie Belle’s Christmas Mystery Box challenge! It’s always fun to receive a package not knowing what’s inside. Like a kid at Christmas, I couldn’t wait to pull open those flaps and see what was inside! As a special treat, you can open the box with me through the magic of video!
There were so many beautiful products included in the mystery box! There were different types of paints and stencils, a shimmery glaze, and some Sea Spray. Included in the box was the mystery Christmas theme: a Coastal Christmas, and a link to one of my favorite Bing Crosby songs of all time: Mele Kalikimaka!
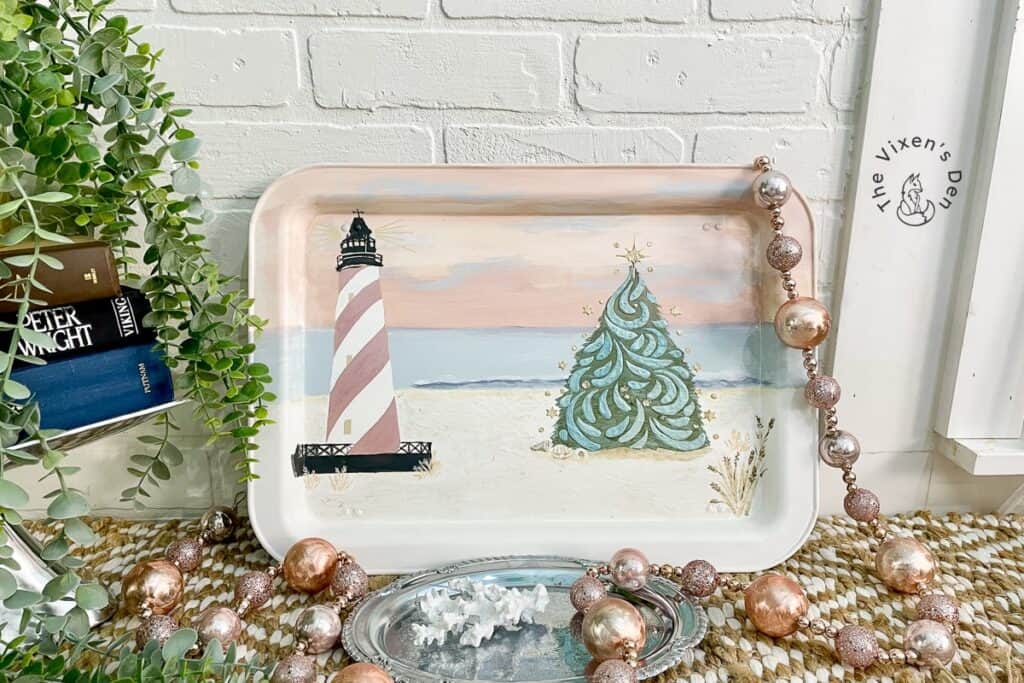
With Bing Crosby crooning over the speakers, I started brainstorming ideas for a makeover that would celebrate the Christmas season, but not take up too much storage space. I like multifunctional decor too, so I chose this vintage tv tray that could also double as a sign. Functional art is my jam!
With visions of ocean waves and sandy beaches dancing in my head, it was time to get started on the transformation process! But first, some legal business…
This post is sponsored by Dixie Belle Paint Company. While they provided some of the products for this project, all of the opinions are my own. Follow this affiliate link to see all of their amazing products!
AS AN AMAZON ASSOCIATE I EARN FROM QUALIFYING PURCHASES AT NO COST TO YOU.
YOU CAN SEE MY FULL DISCLOSURE HERE.
Now that we have that out of the way, here is the list of tools and materials that I used for this project:
Tools and Materials
Tools
Mini Angle Paintbrush Artist Paintbrush Palette Knife Continuous Spray Mist Bottle
Materials
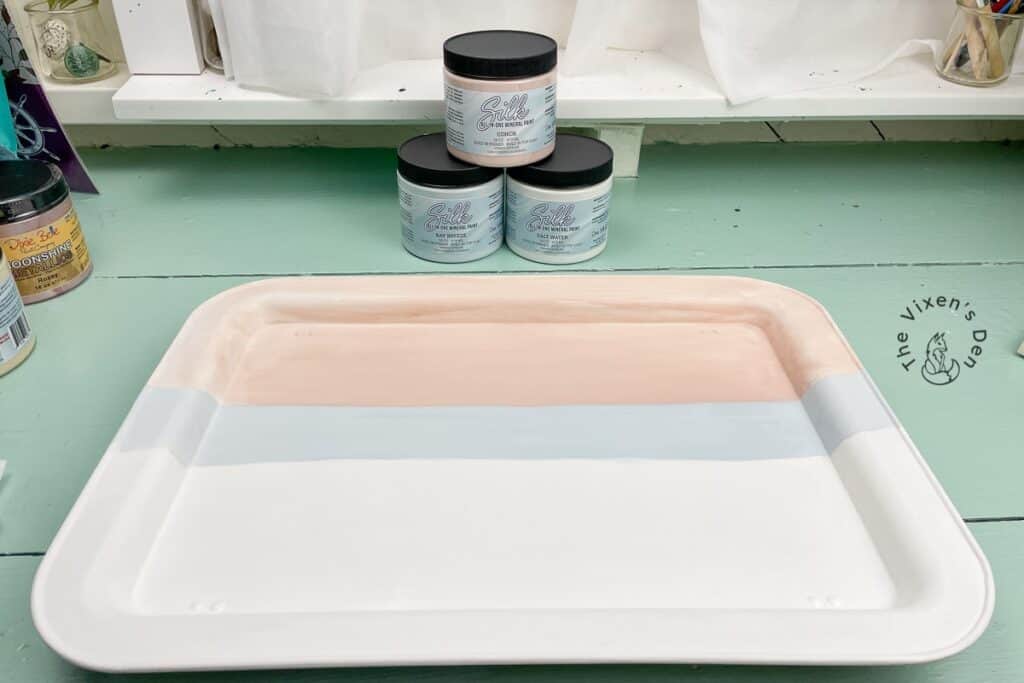
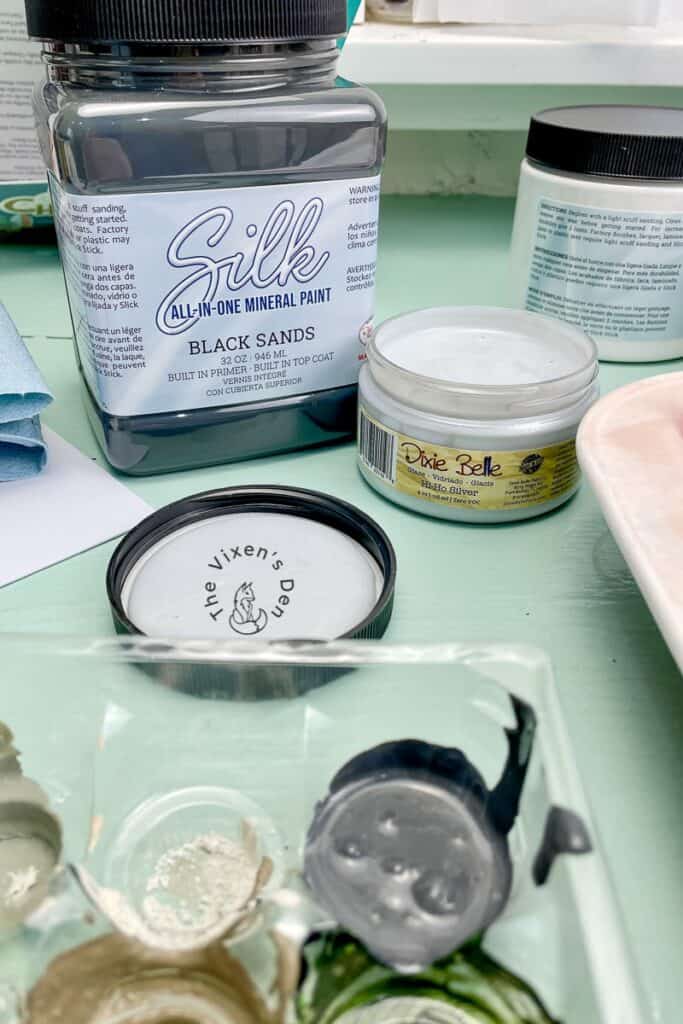
Blue Scrubby White Lightning Slick Stick Painter’s tape - Silk All-In-One Mineral Paints:
Salt Water ,Bay Breeze ,Quiet Cove ,Hampton Olive ,Conch ,Morning Sunrise ,Sand Castle ,Tide Pool ,Black Sands Moonshine Metallic Paints : Rozay, Gold Digger, Deep Woods, Wedding Belle, Caribbean- Glazes: Hi Ho Silver, Pearlescent
Holiday Joy Mylar Stencil Nautical Silkscreen Stencil Sea Spray Gator Hide
Cleaning & Prepping
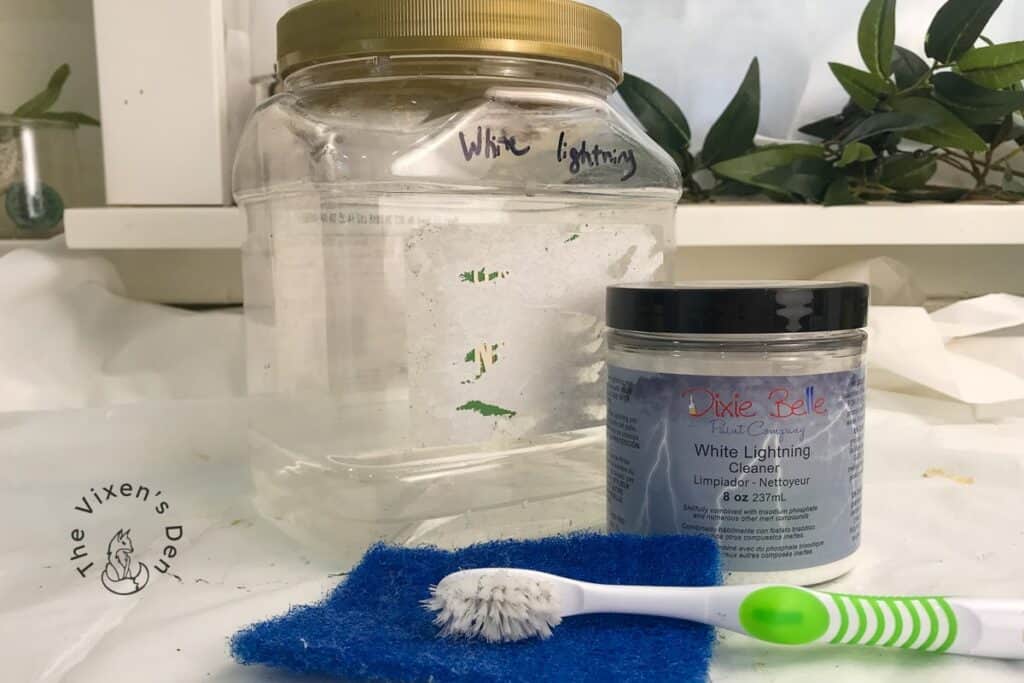
Thorough prep creates a solid foundation for any project. I started off this one by scrubbing down the tray with a mixture of White Lightning TSP cleaner and a blue scrubby and rinsing it under warm water. This removed any dirt and oils from the tray. White Lightning also has a deglossing effect, to help paint stick to the surface.
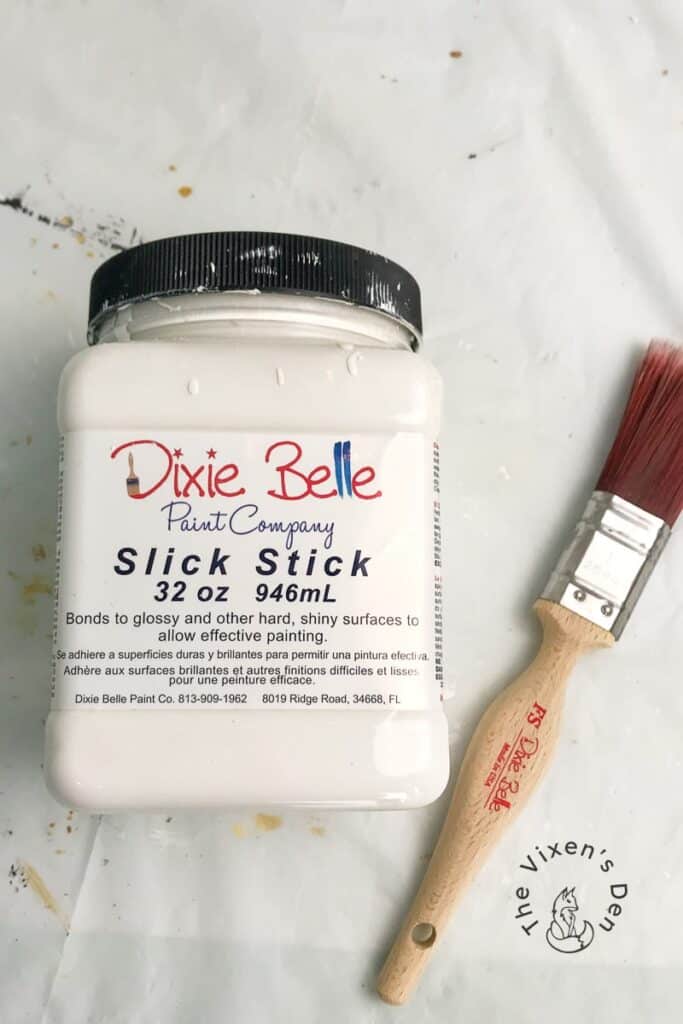
I like to take that a step further, however, so I also painted on two coats of Slick Stick with my favorite 2″ Mini-Angle Brush. This is just to make sure that the paint would be less likely to chip if it is banged or scraped against something.
Painting the Background
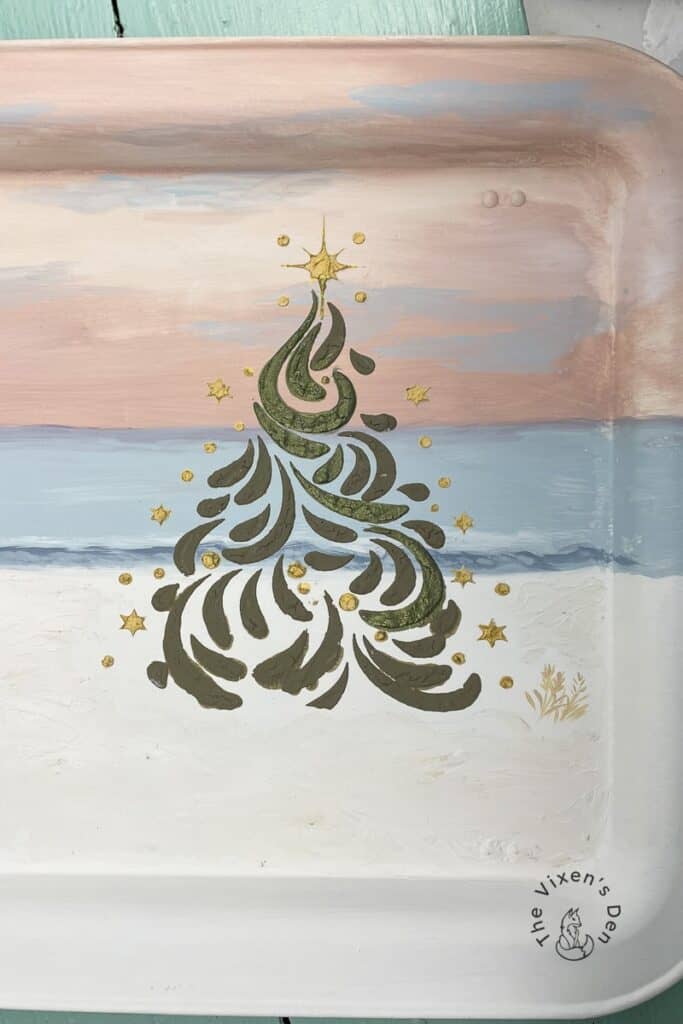
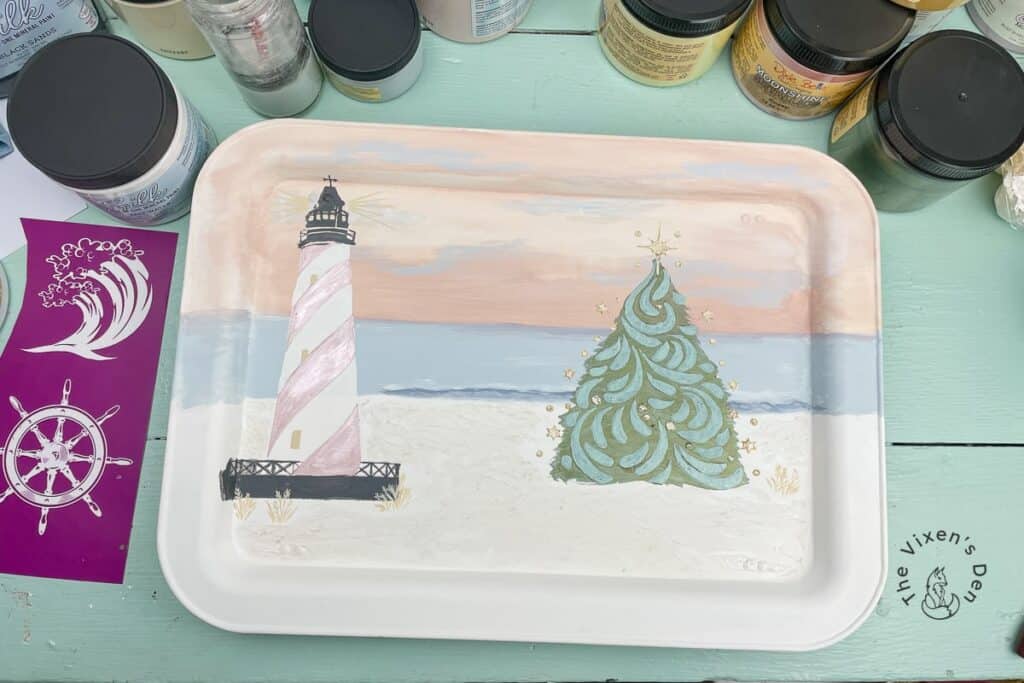
I searched through a lot of images before I chose a cute picture with Christmas trees on a sandy beach and sea grass in the foreground. Using this picture as my inspiration, I began painting out the background using an Artist’s Brush. The scene consisted of three distinct sections with three different paint colors, the sky: Conch, the ocean: Bay Breeze, and the beach: Salt Water.
I added in some rolling waves with a bit of Quiet Cove and moody morning clouds in Morning Sunrise. I blended the colors while the paint was still wet, which is necessary with the Silk Mineral line because it contains both primer and sealer. Once it dries, you can’t go back and rewet it to blend in more colors or soften up the edges.
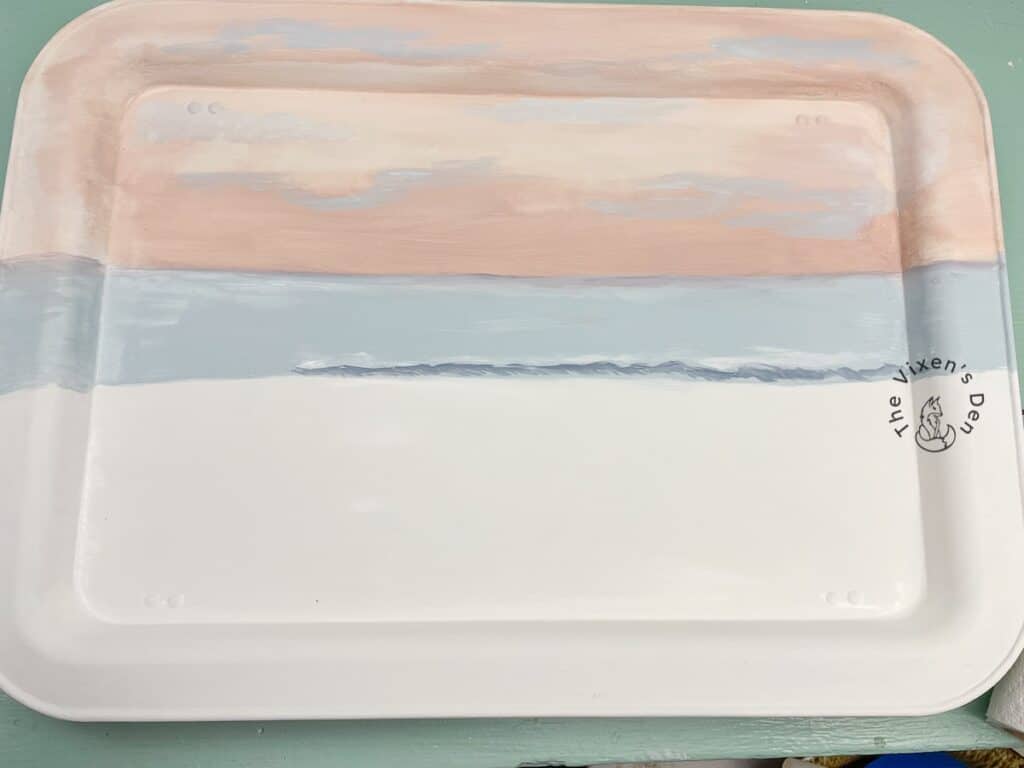
The best way that I found to blend the Silk paints is to treat it like watercolors and keep the brush wet. I dipped the brush into the rinse jar, blotted off the excess on a paper towel, and then swept the paintbrush back and forth between the colors that I wanted to blend.
Stenciling with Sea Spray
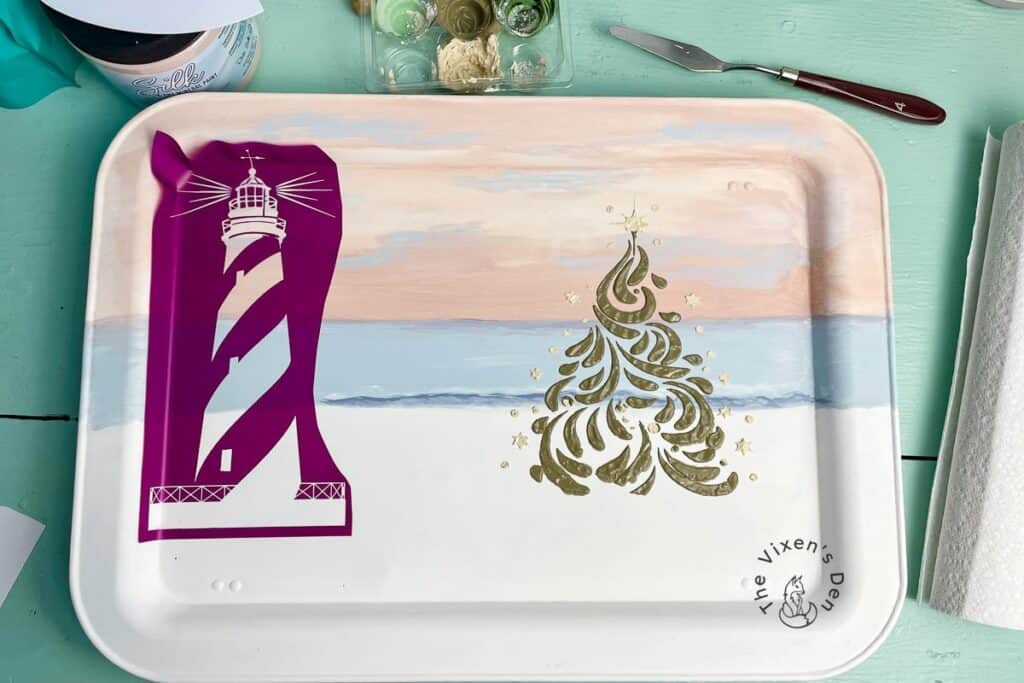
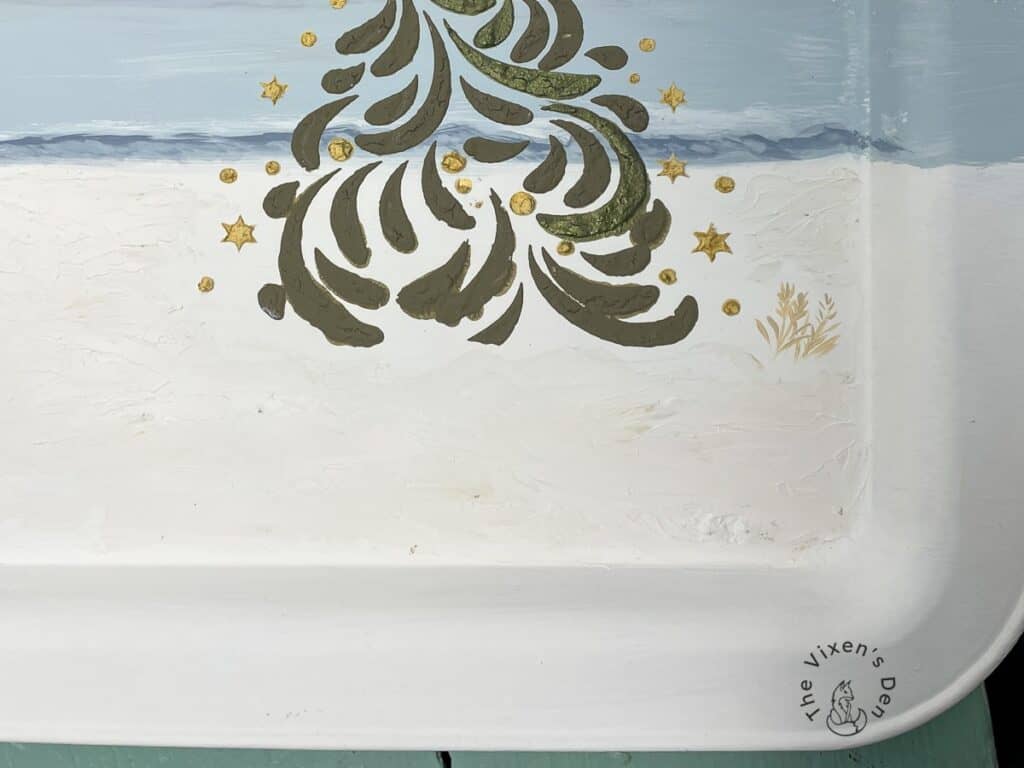
I let the background dry overnight and then started working on the focus points of the scene. The Holiday Joy Christmas tree stencil was perfect for creating my beachy Christmas tree! The stencil was a little large for this project, so I taped off sections with blue painter’s tape.
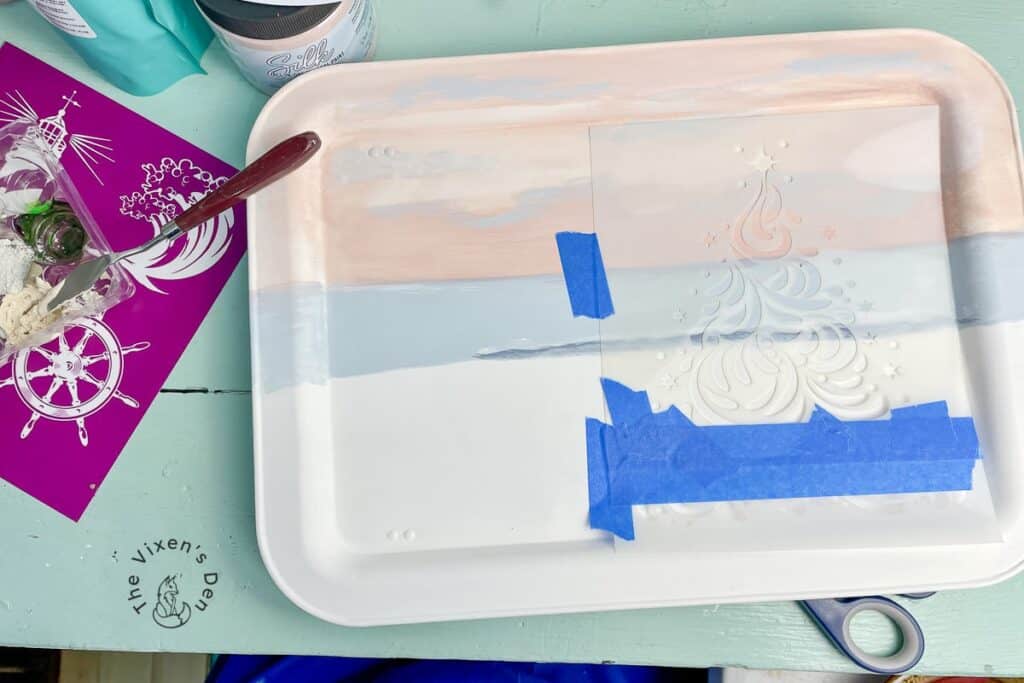
I scooped some Hampton Olive onto a paint tray and sprinkled some Sea Spray overtop, then mixed it all together using a palette knife. Next time, I might measure, but this time I didn’t. I used the palette knife to scoop the paint and Sea Spray mixture onto the stencil and then spread it around over the stencil, much as if I were frosting a cake.
The same process was repeated using Sand Castle for the stars and lights on the stencil.
Hindsight is 20/20 Tip: After the stencil was completely filled, I peeled the stencil back and let the paint dry. Here is where things get a bit hinky. I don’t know if I just used too much Sea Spray and not enough paint, or if placing the tray in front of the heater to help it dry faster caused it, but as it dried the raised stencil experienced cracking. For me, this wasn’t really a problem because I like texture and an aged look, but it’s something to consider if you’re expecting a perfectly smooth finish for your project.
Stenciling with Silkscreen Stencils
I adore silkscreen stencils. They provide an incredible amount of detail and they are flexible which makes them easier to use when wrapping an image around a corner or a rounded edge. The Belles and Whistles silkscreen stencils have the perfect amount of stickiness without being so sticky that I’m afraid they will pull the paint underneath when I peel it back.
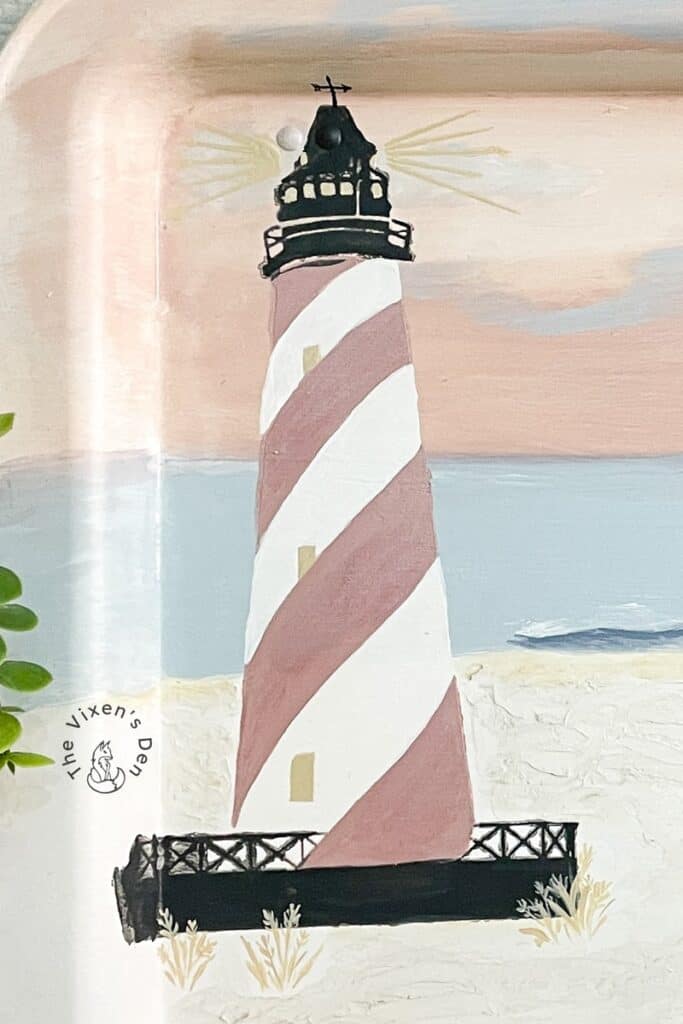
After adding the Holiday Joy Christmas Tree, I cut the lighthouse out from the Nautical stencil pack and firmly pressed it down to the surface of the tray. The stencil set comes with a scraper to fill the mesh with paint and remove the excess. The tray does not have a completely smooth surface, so I chose to use my Artist’s Brush to paint the mesh instead.
Whenever I paint a silkscreen stencil instead of using the traditional scraping method, I have to be very careful to look for unfilled pockets of mesh. These pockets tend to look grey and the mesh is easily visible. Those spots need more paint added or the image will be incomplete when the stencil is removed. This can play in my favor, however, if I’m trying to create a rustic-looking image.
I painted the lighthouse with this beautiful pink, Conch, instead of red. This matches the soft coastal feel of the scene. To accentuate the rails and roof, I used a soft black called Black Sands and mixed it with Hi Ho Silver glaze to give it a bit of shimmer.
When I lifted the stencil, there was a bit of bleed over between the colors. This isn’t a problem, however, as in this case the stencil was just a guide to lay out the edges of the lighthouse.
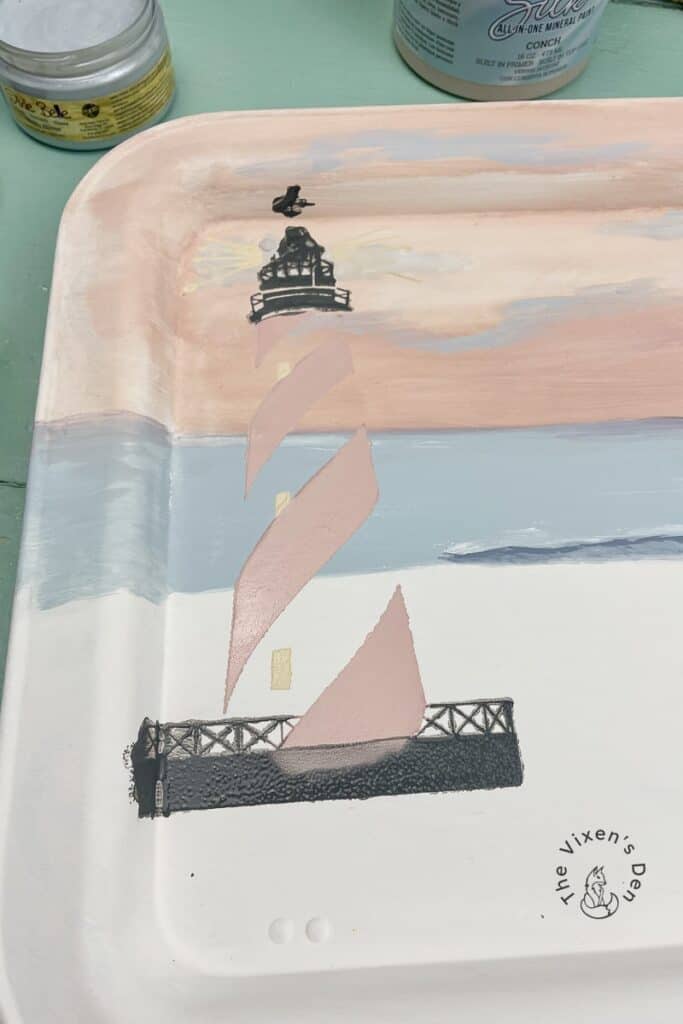
Before the paint dried I wiped off the weathervane at the top of the image with a damp paper towel, because that was just a hot mess, and painted it back in by hand. I also used a wet paintbrush to lift the paint off of some of the areas that had bled over into the white space.
I filled in the white sections of the lighthouse with Salt Water. In hindsight, I probably should have chosen a different white so that there was more contrast between the lighthouse and the beach, but I had other plans for that, so it worked out.
I tidied up any rough sections of the roof and railings using the mix of Black Sands and Hi Ho Silver and added lights to the windows with a coat of Sand Castle. I also painted over the Conch sections of the lighthouse stripes with Rozay.
Creating Textured Sand with Silk Paint and Sea Spray
To recreate the impression of a sandy beach, I mixed Salt Water with some Sea Spray and just a hint of Sand Castle. Using the palette knife, I spread the paint mixture across the beach, similar to frosting a cake.
After the sand dried, I painted over it with Hi Ho Silver Glaze, to add a bit of shimmer.
Painting in the Details
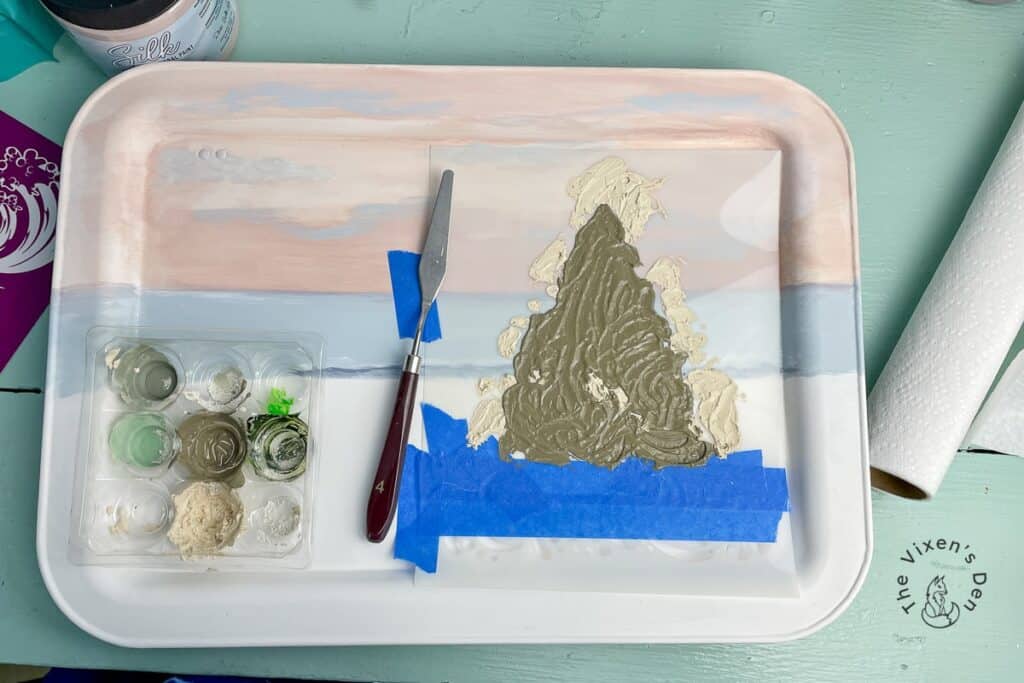
After letting the stenciled and textured paints dry overnight, it was time to fill in all of the gaps and add some pizazz! What better way to do that than with some gorgeous metallic paints?
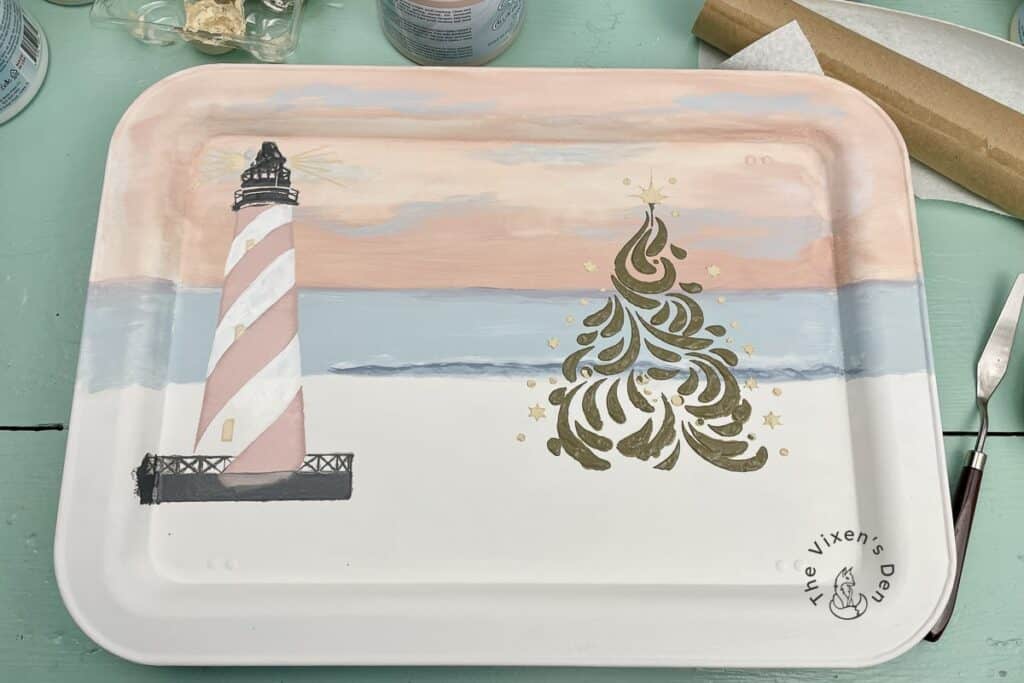
I loved the effect of Rozay on the lighthouse so much that I decided to recreate it on the Christmas tree by covering Hampton Olive with Deep Woods. (This green has some gorgeous gold undertones!) I also painted a coat of Gold Digger over the stars and lights.
At first I planned to keep the tree open and wispy looking, but it looked a little odd with the background showing up so distinctly between the stenciled areas. So, I changed directions and filled in around the stenciled areas with more Deep Woods.
Once the tree was filled in, it looked a bit too bland. So, keeping with the coastal theme, I pulled out Tide Pool and painted the stenciled areas which transformed them into a beautifully textured ribbon!
The stars and lights around the Christmas tree were looking a little too orangey for the soft pastel scene, so I applied a coat of Wedding Belle and it was perfect! I also added a coat of Wedding Belle to the lights in and around the lighthouse. It gave an extra shimmer that made me very happy!
I also added shimmer to the ribbons on the tree by combining Pearlescent and Caribbean metallic paints. I dipped the very tip of my artist’s brush into first one and then the other color and blended them on the surface of the ribbons. This created a beautiful shimmery marbled effect! I also added a tiny bit of highlights here and there on the ribbon by brushing a bit of Salt Water onto the high points with a wet brush.
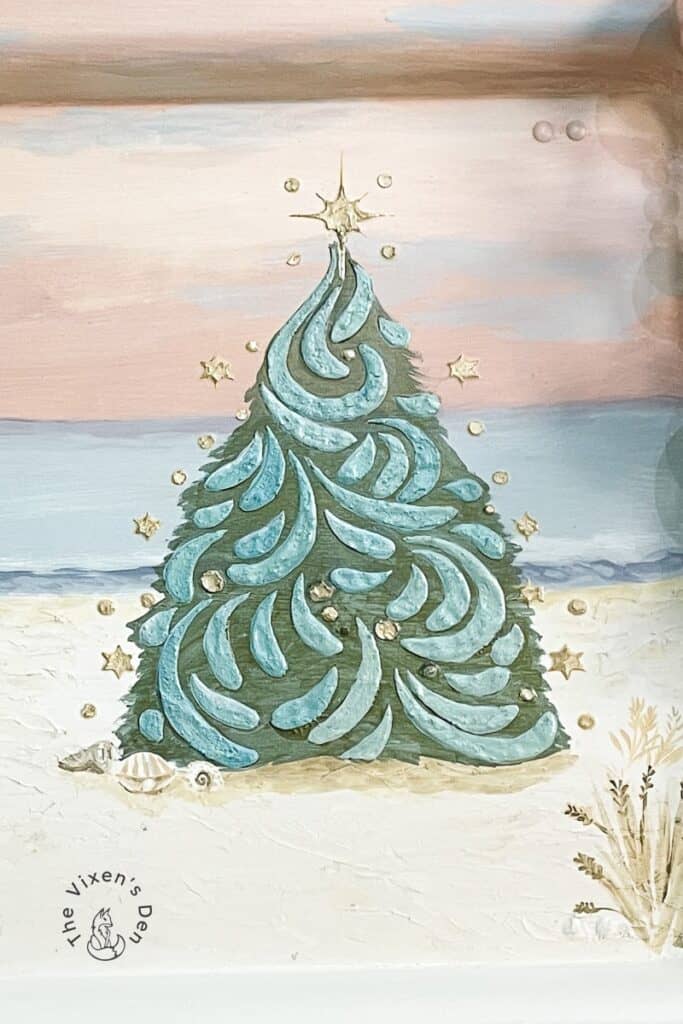
To give the scene a bit more balance, I used Sand Castle along the waters edge to simulate wet sand. A combination of Sand Castle and Hampton Olive created the shadows under the Christmas Tree as well as the sea grass and seashells.
Sealing with Gator Hide
A tray can lead a hard life, between wet drinks and spilled food. To provide the best protection possible to this beautiful project, I brushed on 2 thin coats of Gator Hide. This product is water resistant and will keep the paint protected from drippy glasses, food and dings.

Final Reveal
Are you ready for the final before and after? Drumroll, please!

What a difference a little paint and effort can make! I bet Santa would love to find his milk and cookies on this transformed tray! This lovely tray is now ready to display as a sign or be put to work to hold drinks and snacks at your next Christmas party. It’s so cute that I dare to say that it could even be used year round!
This projects was so much fun! From opening the mystery box to planning the design and bringing it to life, I had a blast! I really enjoyed working with products that I hadn’t used before and learning that I love creating texture with paint! I hope this project has inspired you to try new things and discover new techniques.
Thank you so much for stopping by! Check out the other amazing projects at the link parties below. I know the hostesses will appreciate your visit and comments.
Until next time, have a beautiful and blessed day!


Linked up to these lovely link party hostesses at:
Inspire Me Monday (Create With Joy)
Don’t forget to sign up so you hear all about the next misadventure! Until then, you may also like this Magazine Rack makeover or this post about How to Create a Raised Stencil using Dixie Mud!
Really nice! You work is always well done.
You’re so sweet! Thank you so much, Trishia!
You really know how to make beautiful things, Becky! I love everything about bringing coastal decor and marrying it with Christmas! Thanks for sharing!
Thank you so much, Meredith!! Coastal Christmas decor is so much fun.☺️
What a cute idea Becky, thank you for inspiring us.
Thank you so much, Cara!
Your tray came out great and looked like so much fun to make! I’ll have to look into this more. Thanks for sharing.
Thank you so much, Catherine!