How to Troubleshoot the xTool P2 “Air Pump Current” Error
Working with a new piece of equipment is bound to result in some hiccups along the way. Nevertheless, it’s still frustrating when something breaks and an exciting opportunity comes to a grinding halt.
After such a smooth setup process I was caught off guard when the “Air Pump Current” error popped up on the screen. This is the story of my time spent with the patient xTool support team, and how we managed to wrangle the error into submission!
This post is sponsored by xTool. While they provided the machine for this project, all opinions are my own.
Follow this affiliate link to see all of their amazing laser engraving and cutting machines and materials!
AS AN AMAZON ASSOCIATE I EARN FROM QUALIFYING PURCHASES AT NO COST TO YOU.
YOU CAN SEE MY FULL DISCLOSURE HERE.
Tools and Materials
Tools
- Interchangeable screwdriver (provided)
- Small hex head tool (provided)
- Microfiber cloth
- Microfiber gloves
- Microfiber swabs
Materials
- Toothpick
- Isopropyl alcohol
- Masking tape
How It All Started
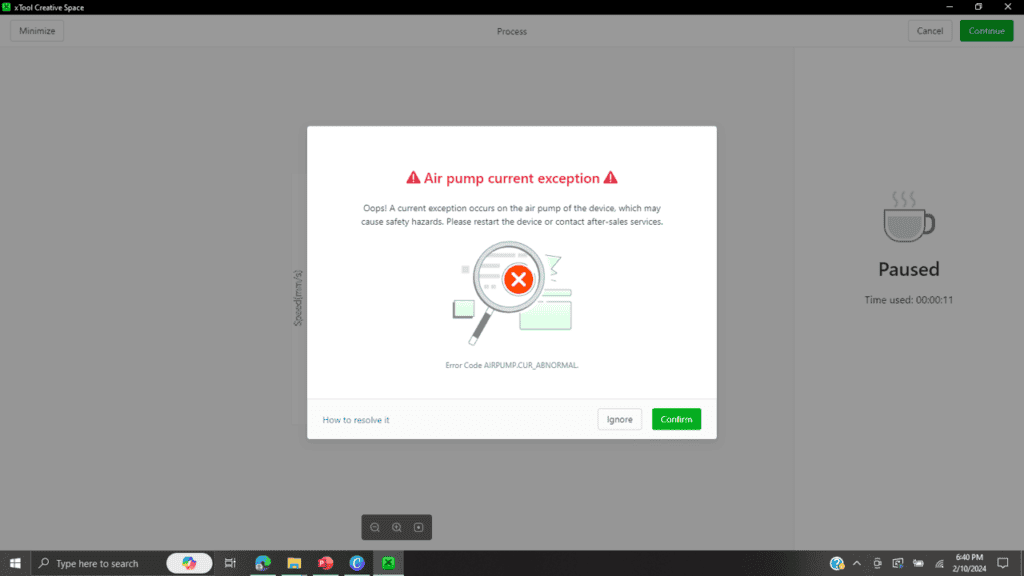
After an hour of run time, I received the P2 equivalent of a computer bluescreen:
While it may seem a little over the top to write an entire post on one error, I had so many misadventures along the way that I’m hoping I can help at least one person by sharing this experience.
What Not to Do
After experiencing such a successful setup following watching the xTool videos, I confidently hopped over to their website and found this article, promisingly titled “Air Pump Current Exception.” I started reading through the steps, feeling my confidence slip tremendously with each sentence. Step 2 covers checking the UI board and then step 3 involves replacing the entire air pump.
Whaaaat?
I mean, don’t get me wrong. Through the power of online video, I have performed tasks like troubleshooting and repairing a carpet shampooer and disassembling my dryer to replace a bearing successfully. But when we get into the world of testing voltage and current, we have stepped far beyond my creative world of paintbrushes and stencils.
Then, when I tried following the troubleshooting step where I clicked a link to test the air pump and nothing happened, I threw up my hands and reached out to customer service through email.
Pro Tip: Make sure the P2 machine is actually turned on when you click on the air pump testing link in step 2. (It’s remarkable how much better it works that way. *facepalm*)
The support staff was so pleasant and helpfully walked me through the testing steps. Our correspondence did not discuss anything involving UI or the air pump, although I had the back of the machine opened up just in case.
It did take a while to resolve issues because the support staff are located in Shenzhen China (presumably) and therefore are sleeping when I am up and working with the P2. They were very responsive, however, and their recommendations were thorough.
Pro Tip: When requesting assistance, send them the work log and the serial number of your machine to help them with the troubleshooting process. It is also more helpful to send them a video instead of just pictures.
Do This Instead
After walking through the troubleshooting process, I think the official guide may have the steps a little backward. So here’s what I recommend:
Step 1: Run the air pump test. Per the official instructions on the xTool site:
- Plug the USB into your computer and the P2
- Turn the P2 power button on
- Click on one of the following links to turn on the air pump:
Hold your finger or a piece of paper under the nozzle with the air pump turned on and see if you feel air coming out.
Pro Tip: Unless you don’t have any air coming out of the laser head, I strongly recommend skipping tutorial steps 1-3 and starting on step 4 instead.
Since I could feel air coming out of the nozzle, the best thing for me to do was to clear the air tube connectors and laser outlet.
Pro Tip: Now I did have a little hint that this might be the case when I wiped my finger across the nozzle and found wood dust from processing. I thought that I had cleared the nozzle enough, but it turned out that it wasn’t.
Remove the laser head covers. This is pretty simple, as they are held in place magnetically. Here’s a video showing how easy it is:
The next step was much more of a struggle.
The instructions say to pull off the connecting hoses, but I swear mine were installed with E6000! The demonstrator in the troubleshooting video just pulled their hoses right off like it was nothing.
I tugged and pulled, and compressed that tiny little round clamp thingy and pulled some more. I even pulled out my pliers in a state of frustration and used them to grip the hoses, but was terrified of damaging such an expensive piece of equipment. Finally, in a last-ditch effort, I gave them a good hard yank and they pulled free.
Sheesh!
Pro tip: Don’t be afraid to pull hard to remove the hoses.
The rest of the tear-down process was much smoother and went as outlined in the tutorial.
Pro tip: Placing a microfiber cloth on the slats provides a soft landing spot for the focus lens and all the other tiny pieces.
A simple toothpick was all that I needed to successfully clean the air tube connectors and the laser head outlet. While I had the laser head torn down, I went ahead and cleaned the lens with alcohol and a microfiber swab.
Pro Tip: While the tutorial recommends using plastic gloves to reassemble the focus lens, I find that sometimes those gloves can stick, so I prefer to use these microfiber gloves instead.
With everything cleaned up, it was time to put it all back together!
This part was much simpler, although I did find placing the coiled air pump hose back into place a little tricky. Just be careful not to pinch the air hose as you slide it back into its channel.
Post-Reassembly Testing
After reassembling the focus lens and various parts, I retested to make certain that the lens and mirrors were still properly aligned.
Final Thoughts
While this was not my favorite experience with the P2, it was helpful to learn about the machine and the support that xTool provides. It’s reassuring to know that xTool is upfront about problems that may occur (such as a failed air pump) and provide a variety of resources to help overcome them. (Let’s hope I don’t have to use them, though.)
Here’s a summary of my takeaways from the Air Pump Exception error:
- When troubleshooting, always start with the simplest solution and work your way backward. It’s easy to complicate the situation unnecessarily when all the machine might need is a simple cleaning.
- Don’t be afraid to tug on these hoses and fittings because they are tight! I’ve been pretty nervous about damaging the machine because it’s soooo expensive. After this experience, I can say that it seems so well built that it might be able to survive even me! So dig in there and pull those connectors loose!
- Shenzhen is 12 hours ahead of EST, so it can take a while to troubleshoot by email when I’m sleeping as they are working and vice versa. Providing detailed information, such as the work log, a video of my troubleshooting, and the serial number of the machine helped the tech support staff. Be sure to be as detailed and factual as possible so they can help you work through the problem.
- Once the machine is reassembled, test, test, test! It’s easy to slip the lens in upside down or knock a mirror or the gantry out of alignment, so be sure to test to make sure that everything is properly aligned before jumping back in to start creating again.
Now that the P2 and I are back on good terms again, I’m looking forward to moving past this little glitch and creating something amazing!
Ready to dive into the creative world of xTool laser engraving and cutting? Click below to start your xTool journey. At checkout, enter code AFFMTRS15 to receive 15% off select materials!


Thank you so much for stopping by! Until next time, have a beautiful and blessed day!

Don’t forget to sign up so you hear all about the next misadventure! Until then, you may also like this Beginner’s Guide to Setting up the P2 or this post about Finding the Right Power and Speed Settings.


Becky,
I cannot thank you enough for this awesome post and videos!! You saved my sanity!! I did have quite a bit of it already apart before I sat down to research a little more…and then I found you!! Now to find the original homes for all of the 30 screws that I have taken out!! Thanks again!
I’m so glad this was helpful! I hope the screws all find their home. Lol
Hi Becky,
I’m having the same issue. do you happen to have more details on how to take apart the laser head and lens and such? I’m very new to laser cutting and have the P2 as well!
Hi Sam! Let me see if I can get you a video to help with that.
Hi Sam,
I appreciate your question so much! I have put together a video to help with that process. You can check it out here: https://youtu.be/5vE_-uumtx8.
Thank you so much for visiting. Please let me know if you have any other questions.
Have a wonderful day!
how do I get the air pump to run when I am not cutting???? I checked the nozzle and hose in the head and they seem clear I did blow in it and wipethre the tip but the back and nozzle were both seem to ok. does that mean I have to get a meter out to check the board?????
Hi Dolores! I’m so sorry that you’re having this issue. In order to make the air pump run without cutting, you must have the computer connected to the P2 with the USB cable, have the machine turned on, then click on the special link. I’ve added the links from the xTool article to the post. Please let me know if you have any other questions!