How to Fix Uneven xTool P2 Laser Cutting and Engraving
Is your P2 laser cutting and engraving unevenly? Nothing is more frustrating than creating the perfect design, and watching the P2 laser machine birth it into existence, only to find out that the time and material were wasted because the engraving or cutting was uneven.
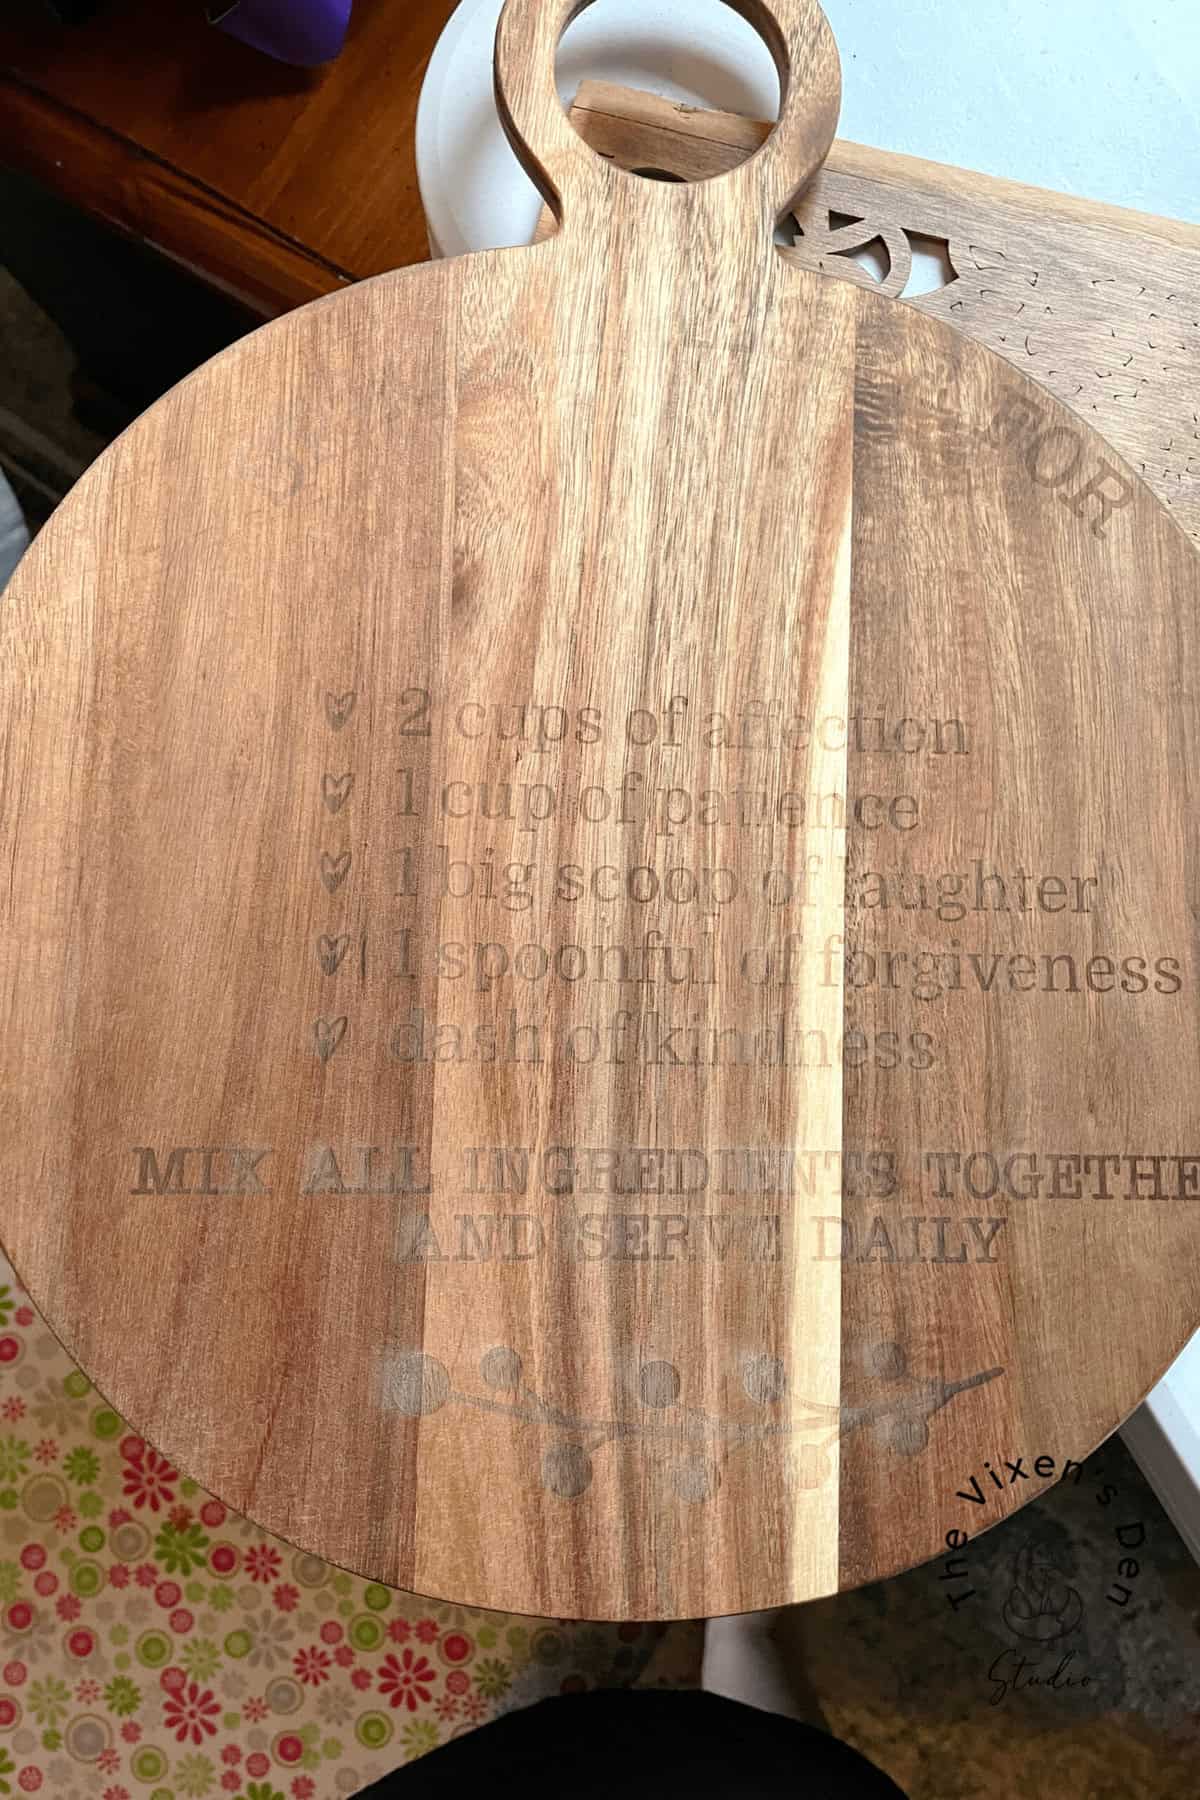
As I mentioned in the setup post, I chose not to clean the mirrors because I wanted to see how the machine performed out of the box. The initial test projects seemed to be going great! And then I tried engraving the cutting board in the first picture. The engraving was so uneven that I could have cried. But, the cutting board rocked a little bit on the slats, so I thought the problem must be that the cutting board was warped.
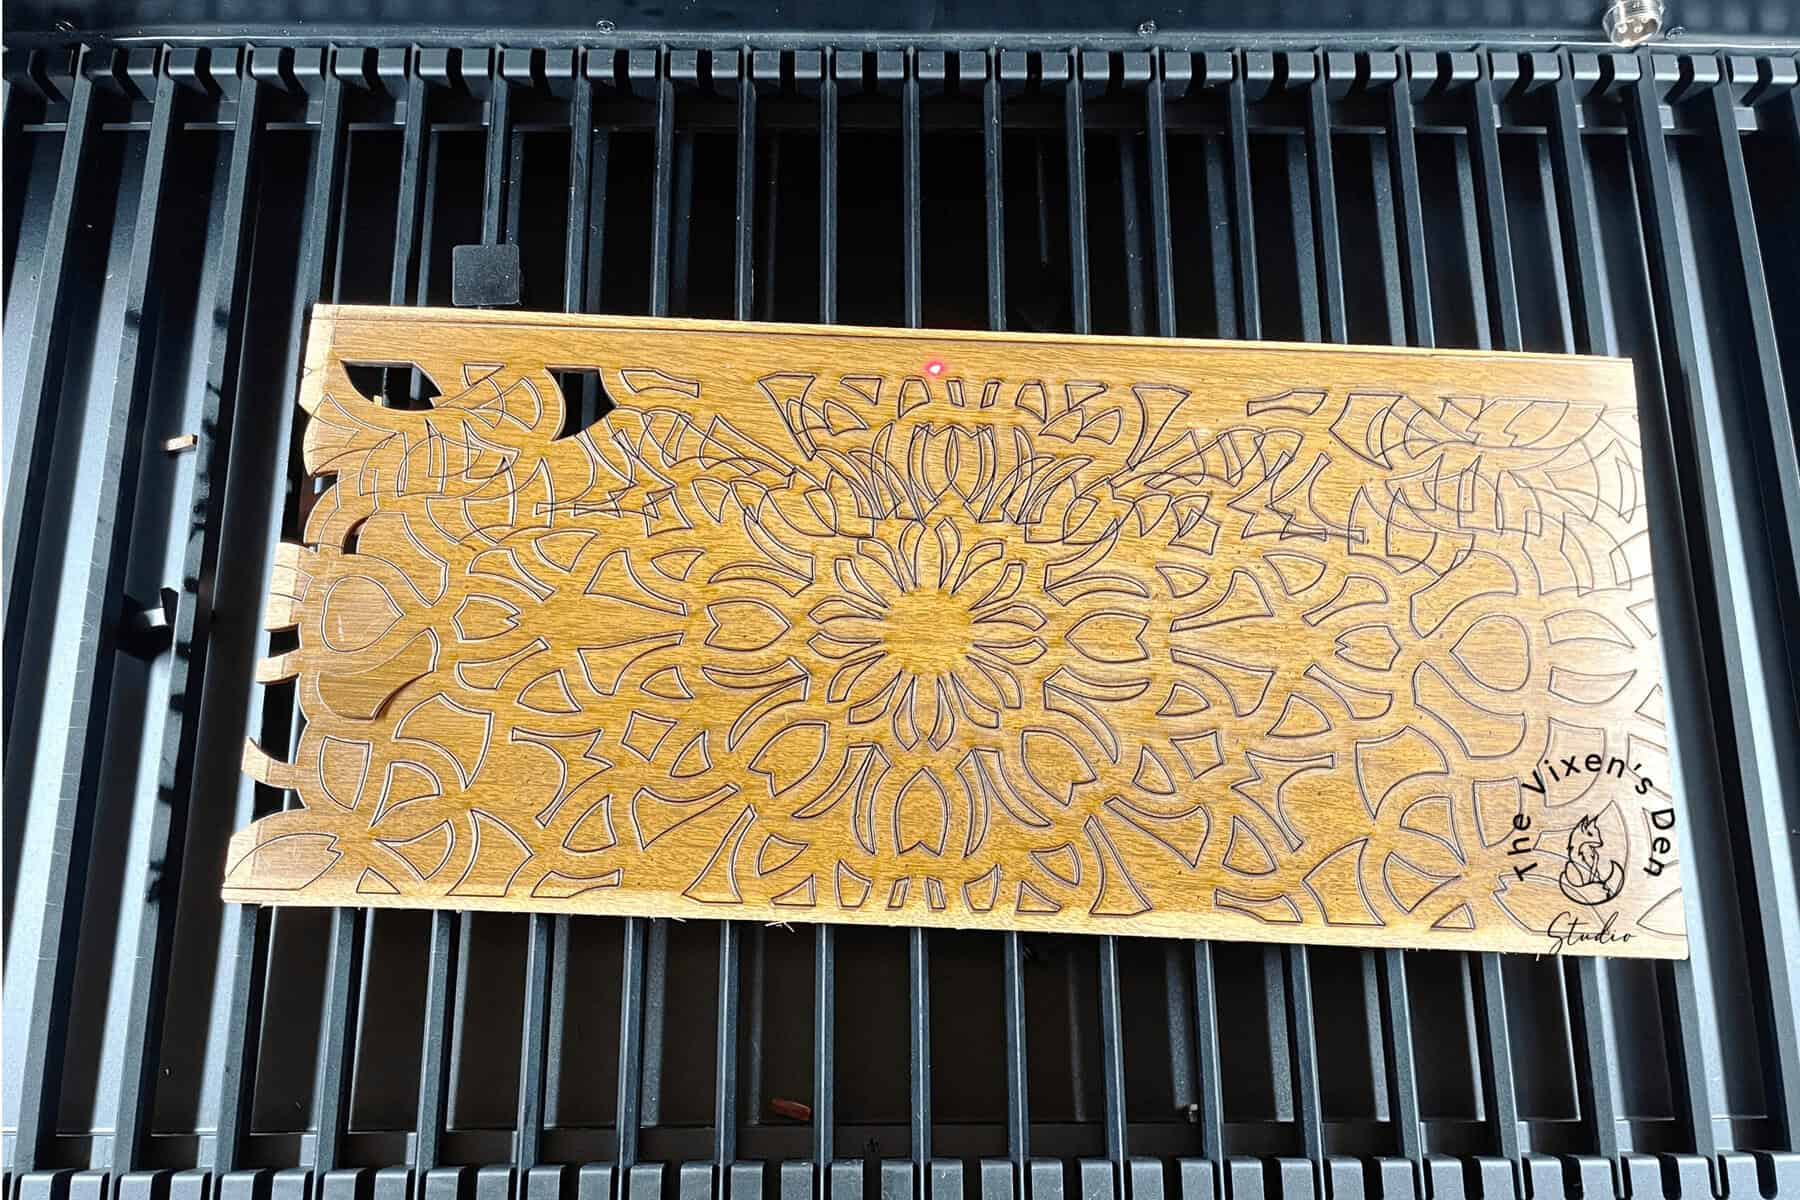
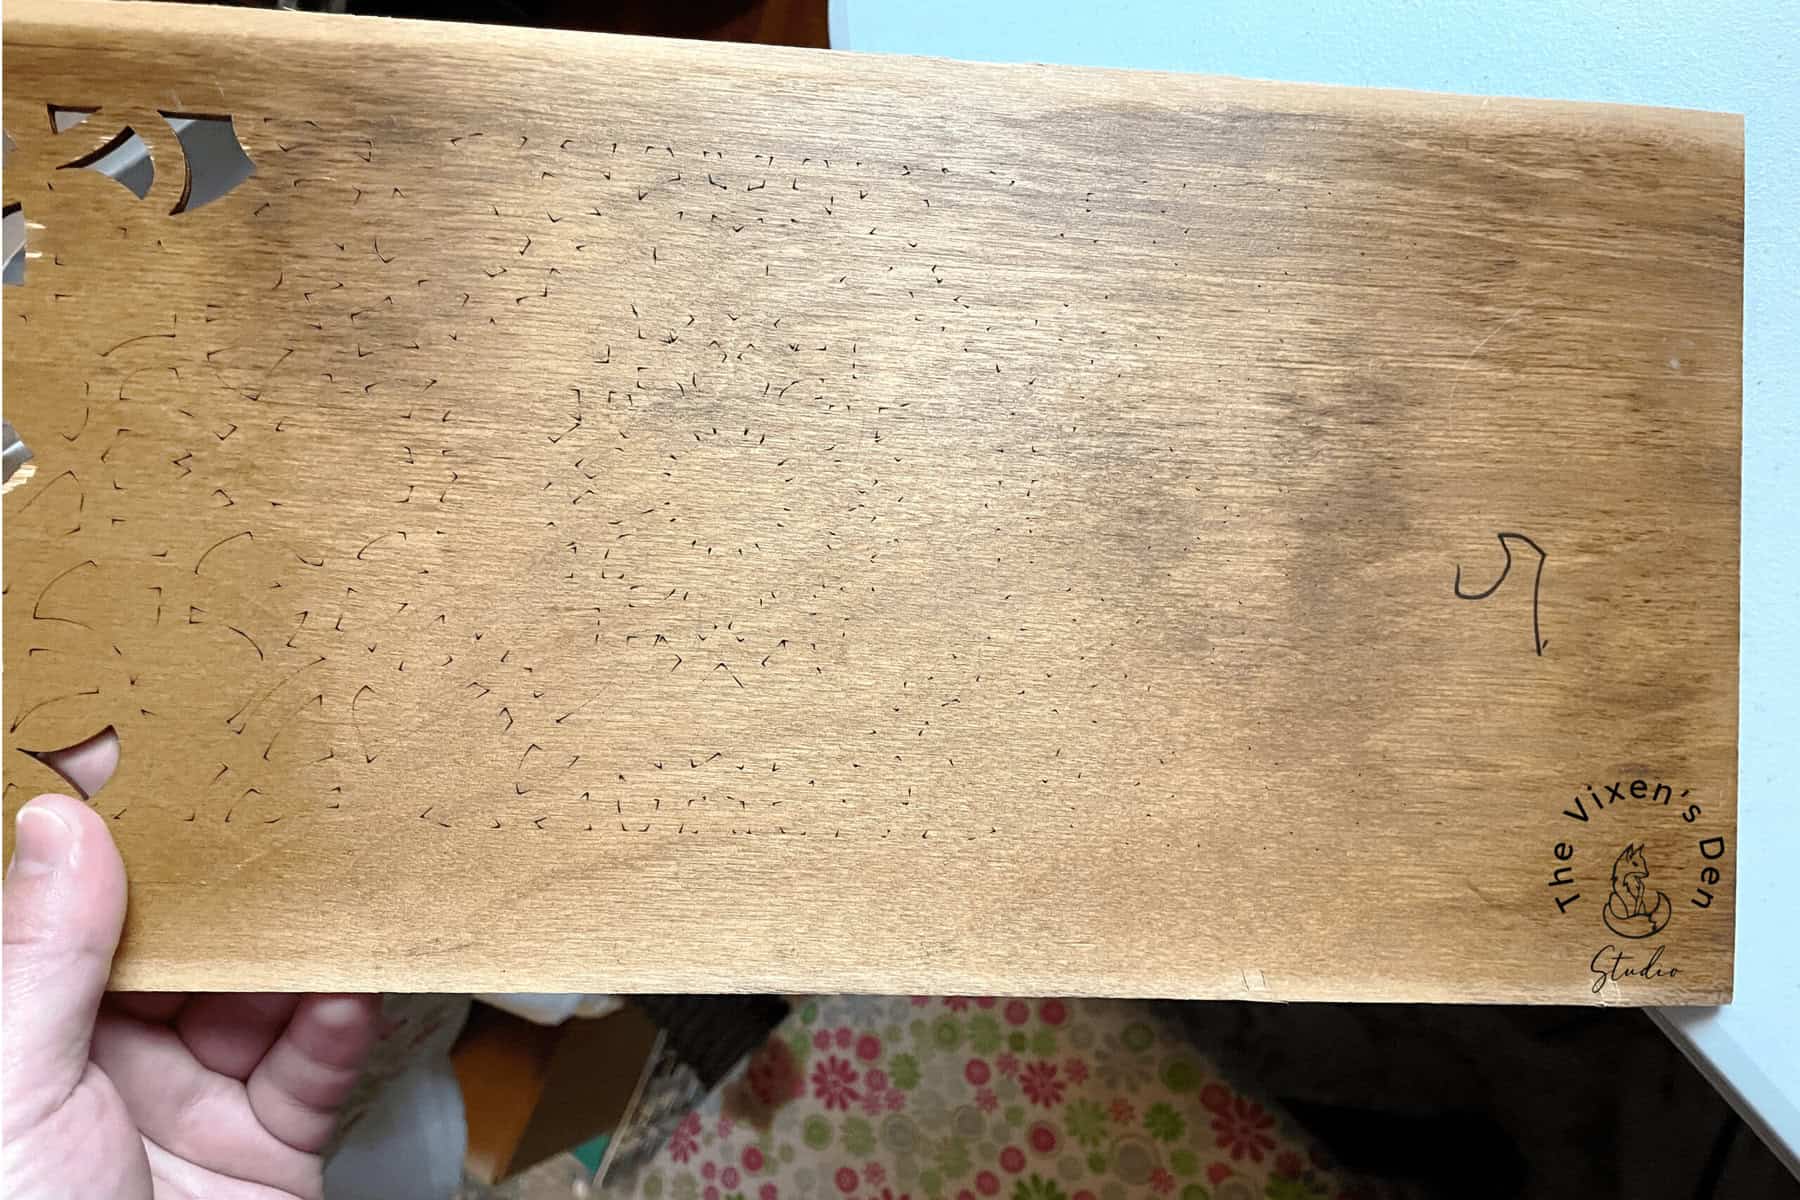
I switched over to flat boards and cut out an intricate design in a panel. The P2 didn’t cut through all the way. I thought I’d try a second pass to see if that helped. Unfortunately, that only revealed that there was a bigger problem.
That’s when I reached out to xTool’s support team and discovered that the machine was going to require mirror maintenance.
The mirror cleaning process seemed very intimidating to this new laser owner, but it turns out that it isn’t so bad after all. This post walks you through the steps to get them squeaky clean and lined back up so that you’re up and running again in no time!
But first, some mandatory legalese for your reading pleasure:
This post is sponsored by xTool. While they provided the machine for this project, all opinions are my own.
Follow this affiliate link to see all of their amazing laser engraving and cutting machines and materials!
AS AN AMAZON ASSOCIATE I EARN FROM QUALIFYING PURCHASES AT NO COST TO YOU.
YOU CAN SEE MY FULL DISCLOSURE HERE.
Tools and Materials
Tools
- P2 CO2 Laser Machine
- Microfiber gloves
- Microfiber cleaning cloth
- Rubber bulb syringe (optional)
- Double-ended screwdriver (that came with the P2)
Materials
- Microfiber swabs
- High-grade Isopropyl alcohol
- Masking tape
Pro Tip: I find that plastic and rubber gloves pick up more debris and are more likely to allow things to slip from my fingers, while cotton gloves can leave fibers on the lenses, therefore I strongly recommend microfiber gloves and swabs.
Testing/Realigning the Gantry
The “gantry” is the rail that the laser head slides on as it moves from right to left over the laser bed, also known as the “X” axis. As was discussed in this setup post, the alignment test is very simple.
- Make sure the machine is turned off.
- Slide the laser head along the Y-axis (front to back) all the way to the front of the laser bed.
- Slide the laser head along the X-axis (left to right) from the far left to the far right.
- If there are any gaps between the laser head and the front of the machine housing, then the gantry needs to be realigned.
Method 1: The simplest method to realign the gantry is to push hard on the side that is not aligned with the front of the machine until the track jumps a notch. Pull the laser head to the front and slide it from the far left to the far right side, measuring to make sure it is now even.
If the laser head is still uneven, then the track will need to be adjusted using the more complicated method:
Method 2: This method requires opening up the back cover from the inside:
- Remove the back panel.
- Loosen the screws on the back coupling.
- Adjust the position of the x-axis guide rails.
- Once they are parallel to the front and rear of the machine, tighten the screws on the coupling.
- Reattach the back panel.
I was able to realign the gantry using Method 1. Although it felt a bit odd to be shoving on the rail, once the right side clicked back one time the laser head lined up perfectly along the x-axis.
Are Your P2 Mirrors Dirty?
What are some signs that your mirrors may need cleaning? Over time, dust and debris can build up on the lenses, causing distortion which can result in:
- Uneven cutting and/or engraving
- Shadowed engraving (where the design is slightly offset)
- Skipped cuts/engraves
While xTool has a video that walks through the cleaning process, there are a few extra tips that I’ve picked up that I’ve found extremely helpful. I’ve combined all that information into the helpful step-by-step guide below. Are you ready? Grab your supplies and let’s get your machine cleaned up and ready to get back to work!
Cleaning Mirror 1
Mirror 1 is the mirror that you will need to clean the least often because there’s a metal panel between the mirror and the laser head. This panel prevents dust and debris from reaching it as easily as the rest of the mirrors. While there is no specific guide to how often to clean Mirror 1, a good (Becky) rule of thumb seems to be whenever the machine is not performing properly, and cleaning Mirrors 2 and 3 did not resolve the problem, or about every 10 hours of machine run time.
Mirror 1 is located in the very back of the P2 machine, which means you will need to remove the back cover.
Pro Tip: Some creatives who use their P2s often have opted to leave out all but one of the screws fastening the back cover to the machine. This makes it very easy to access the back for cleaning the mirrors and fan.
After removing the back panel, locate the mirror on the far right side as you are facing the back of the machine.
Put on the microfiber gloves and pluck the mirror out of its housing. The housing surrounding the mirror is magnetic, so there will be a bit of resistance. Your primary focus (see what I did there? ;D ) is to not drop the mirror into the machine case.
Pro Tip: There is a notch on the mirror which seems as if it should align with a screw in the housing. Mine did not, but I have heard that others do.Take note of the alignment of the notch when you remove it and try to line it back up the same way when you replace it. If the mirror is not fitting back into the housing, then you may need to take a closer look with a handheld mirror to help locate the screw that the notch fits against.
Once you’ve removed the mirror follow these steps to clean and replace the mirror:
- Blow off any dust (I just blow with my mouth, but you could use a rubber suction bulb syringe, like the ones used to clear babies’ noses, which is what xTool recommends in their mirror maintenance video.)
- Then wipe the mirror surface with a microfiber swab dipped in alcohol in a circular motion in one direction, starting from the center of the mirror to the outer edge.
- Watch the surface of the mirror until the alcohol completely evaporates. Tilt the mirror to ensure you don’t see any dried dust or marks on the surface.
- Replace the mirror in the housing with the mirror side facing down. The magnetic housing should pull the mirror back into place, but you may need to nudge it with your fingers to make sure it sits firmly back in its spot.
There are two primary objectives in following this very specific process:
- Remove the debris completely from the mirror
- Not leave any scratches or dried wet marks on the surface
Mirror 1 is now clean, but you won’t want to replace the housing just yet. Let’s move on to Mirror 2.
Cleaning Mirror 2
Mirror 2 is located on the front left side of the laser head. To access it, open the lid of the laser and remove the small cover on the left side of the front of the machine. Then manually pull the gantry to the front until it touches the inside front of the laser bed housing.
This mirror is also inside a magnetic housing, so pluck it out of the housing (being careful not to drop it) and clean it using the same steps as the first mirror:
- Blow off any dust.
- Wipe the mirror surface with a microfiber swab dipped in alcohol in a circular motion in one direction, starting from the center of the mirror to the outer edge.
- Watch the surface of the mirror until the alcohol completely evaporates. Tilt the mirror to ensure you don’t see any dried dust or marks on the surface.
- Replace the mirror in the housing with the mirror side facing inward towards the laser head.
Mirror 2 is now clean, so replace the small cover, and let’s move on to the final mirror, Mirror 3!
Cleaning Mirror 3
The third mirror is located inside the laser head. To access it, move the gantry to the front center of the laser bed. The laser head cover is magnetic, so just pull the top rectangle piece up and off.
With Mirror 3 exposed, pluck it out of the magnetic housing and clean it using the same steps as Mirrors 1 and 2:
- Blow off any dust.
- Wipe the mirror surface with a microfiber swab dipped in alcohol in a circular motion in one direction, starting from the center of the mirror to the outer edge.
- Watch the surface of the mirror until the alcohol completely evaporates. Tilt the mirror to ensure you don’t see any dried dust or marks on the surface.
- Replace the mirror in the housing with the mirror side facing downward towards the laser head. The magnetic housing should pull the mirror back into place, but you may need to nudge it with your fingers to make sure it sits firmly back in its spot with the notch snug against the housing screw.
Replace the rectangle cover on the top of the laser head.
Pro Tip: Make sure the magnetic upper cover is seated firmly back in place. If you can see a white line between the upper and bottom covers, it’s not seated properly. This will cause the laser to bump into the overhead camera and have you pulling your hair out in no time!
Give yourself a pat on the back! All of your mirrors are clean! But the mirrors are only part of the intricate puzzle. The lens must also be cleaned to ensure clean and precise processing. So let’s take care of that next!
Cleaning the Laser Lens
The lens is located in the laser head with Mirrors 2 and 3, but it’s under a magnetic cover located on the front of the laser head. Move the gantry to the center or back of the laser bed to easily access the cover.
I recommend taking the gloves off for these next steps. Lay a microfiber cloth on the slats to prevent parts from falling through to the bed. Then, pull the magnetic cover off and grab the screwdriver that came with the P2.
Two screws hold the laser head in place. Using the hex head end of the screwdriver, remove the two screws and then slide the laser head out of the assembly straight towards you.
Remove the air tube by pressing down on the round clamp towards the end of the air tube until the air tube can be pulled free from the laser head. This can be a challenging step the first time because the machine is very tightly manufactured, but it gets easier.
The focus lens is secured in the laser head by a black screw-in ring with a cut-out notch. Place the point of the screwdriver in the notch and use it to unscrew the ring (rotating counterclockwise). Pull out the ring and the white washer underneath it. Lay them on the microfiber cloth and dump the lens onto the cloth.
Put on the microfiber gloves and clean both sides of the lens using the same process as when cleaning the mirrors:
- Blow off any dust.
- Wipe the lens surface with a microfiber swab dipped in alcohol in a circular motion in one direction, starting from the center of the mirror to the outer edge.
- Flip the lens over and repeat the cleaning process.
- Watch the surfaces of the lens until the alcohol completely evaporates. Tilt the lens to ensure you don’t see any dried dust or marks on the surface. Place the lens on the microfiber cloth.
- Insert a microfiber swab dipped in alcohol into the laser head nozzle and swab the entire inside, pushing through to the tip. Use the swab to clean the outside of the nozzle tip. Repeat until the swab comes away clean.
- Replace the lens in the housing with the curved (convex) side facing up.
- Pro Tip: Placing the lens with the curved side down will cause a whole host of problems, so this is a VERY important step!
- Place the white washer on top of the lens.
- Place the metal retaining ring on top of the washer with the notch up. Use your gloved finger to rotate the ring back into place. Rotate the ring until it sits firmly. Use the screwdriver placed into the notch to tighten the retaining ring securely.
Replace the laser head by pushing the air tube back into the connector then slide the laser head back into the assembly.
Replace the screws (yay for the magnetic screwdriver tip!) and tighten down firmly, but don’t overtighten and therefore strip the screw heads.
Replace the magnetic front cover. Congratulations! Your machine is squeaky clean and ready to start processing again! Now, let’s make sure that everything is lined up using a calibration check.
Calibration Check
It’s a good practice to perform a calibration check every time the mirrors are cleaned. If everything is lined up correctly, then this is a very easy process. The goal here is to cover the optical path holes with masking tape and run a diagnostic test in XCS to ensure that the laser path is centered as it crosses each hole.
The first optical path hole is located on the inside back wall on the left side of the laser bed. Most of the time Optical Path Hole 1, just like Mirror 1, is the least likely to be out of alignment. But if you cleaned Mirror 1 then let’s see if the cleaning process knocked anything out of alignment:
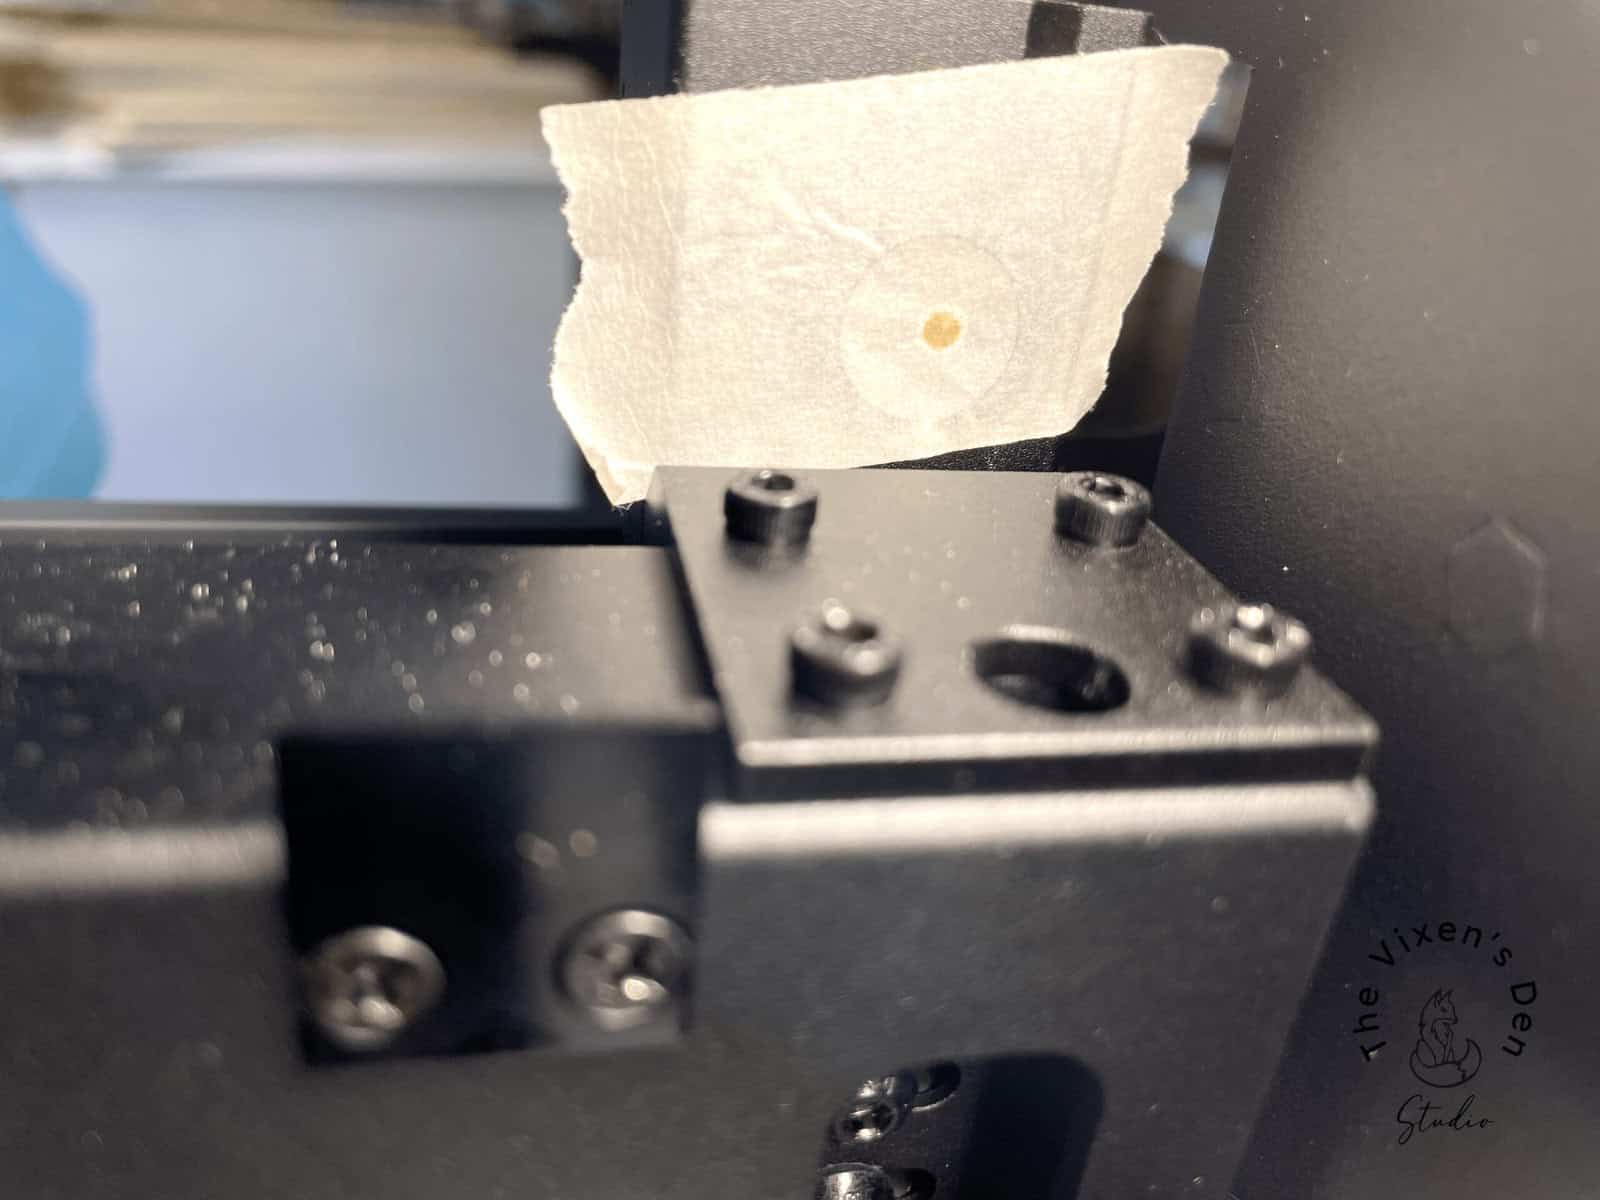
- Grab a two-inch piece of masking tape and cover the first optical path hole.
- Press your finger against the hole to define the edge of the optical path hole on the masking tape.
- Close the lid on the laser.
- Connect the machine to a laptop using the USB cable or to your cell phone using a Wifi connection.
- Turn on the P2.
- Open the XCS software and click on the machine icon in the upper right-hand corner.
- Follow the instructions in this guide and this video to complete the lens calibration test.
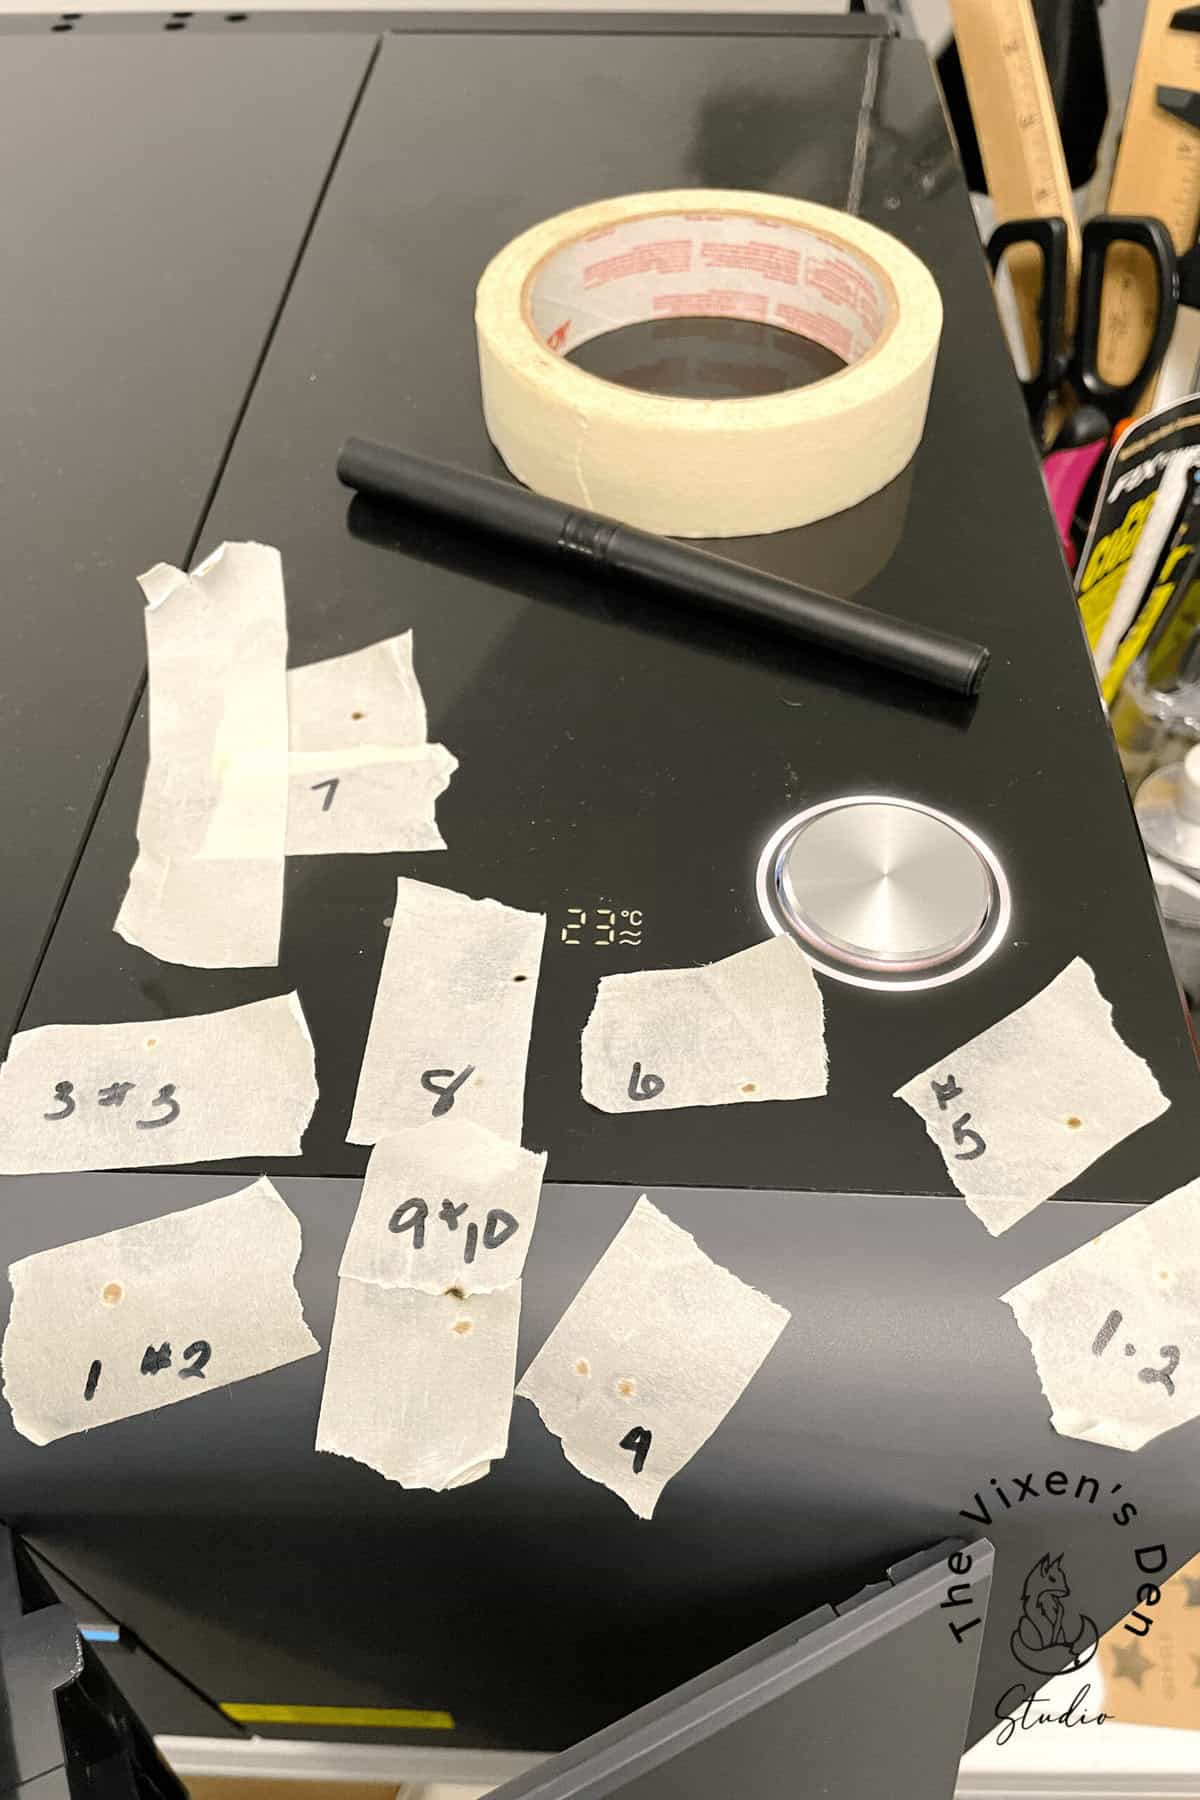
- The key with this test is to pulse the laser a couple of times so that you can clearly see the laser path, without over-burning the edges.
Pro Tip: After the XCS update, I found the software instructions a bit confusing. I needed to make some adjustments to the mirrors but each time I followed the instructions in the software prompts, the alignment became worse. I found these diagrams shared by xTool in the Official P2/P1 Facebook Group much more useful:
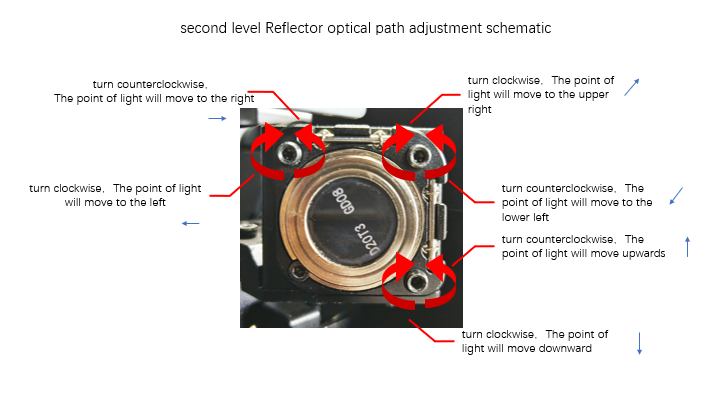
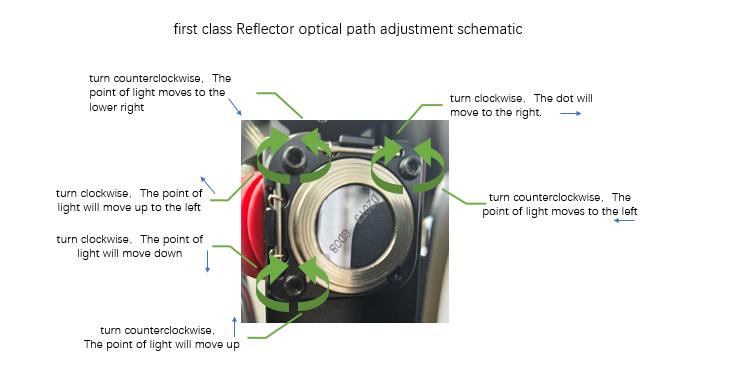
Diagrams are courtesy of xTool.
It took a few tries before I realized that the instructions had me headed in the wrong direction (literally) so it still took several adjustments to Mirror 1 before everything lined up again
Pro Tip: If the test from Mirror 1 to Mirror 2 is centered in the masking tape, but the test between Mirror 2 and Mirror 3 is off-center, then ignore any of the instructions from the software related to Mirror 1 and focus solely on adjusting Mirror 2.
Once the calibration tests fire through the center of the masking tape outline, you’re all set for your next project!
Final Thoughts
If your P2 just isn’t performing to your expectations, check the Gantry alignment and give those mirrors and the lens a good cleaning. While cleaning and calibrating the P2 xTool may seem intimidating at first, it’s a necessary part of the creative process. Once you’ve done it a few times, I bet you can have it knocked out in about 15 minutes.
Then set a regular cleaning schedule every three hours of run time to keep it in shape. My favorite video to follow for a thorough cleaning is from Monkey Woodworks. He does a fantastic job of walking through each step of the process from cleaning the slats to the exhaust fans and everything in between!
Ready to dive into the creative world of xTool laser engraving and cutting? Click below to start your xTool journey. At checkout, enter code AFFMTRS15 to receive 15% off select materials!


Thank you so much for stopping by! Until next time, have a beautiful and blessed day!

Don’t forget to sign up so you hear all about the next misadventure! Until then, you may also like this Beginner’s Guide to Setting up the P2 or this post about Finding the Right Power and Speed Settings.