Stained and Stenciled Headboard
The best pieces of furniture are the ones that tell a story. They’re the ones where every scratch and ding is a memory. A time when Uncle Danny and Uncle Billy were wrestling and knocked the chair over, cracking the arm. Or those scrapes on the legs where Grandma bumped the vacuum against them every. single. Saturday.
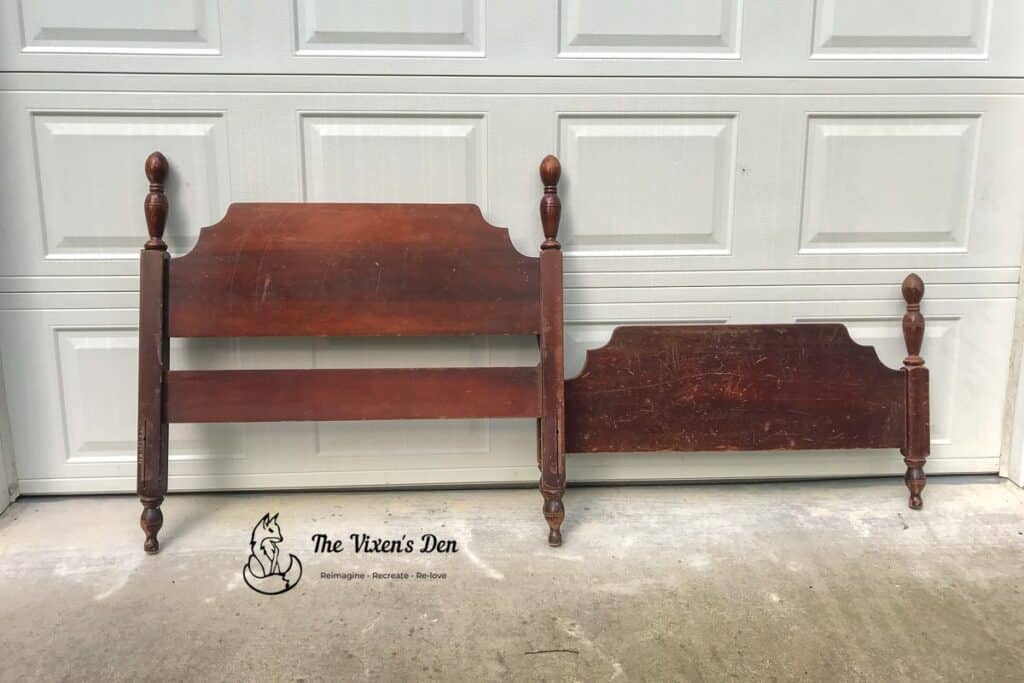
This headboard and footboard set has a LOT of stories to tell.
There are stories about late nights with flashlights under the covers imagining far away places while soaking in one page after another of a fantastic tale. There are stories of stuffy noses, first crushes, sleepovers, and then…starting all over again with the next generation.
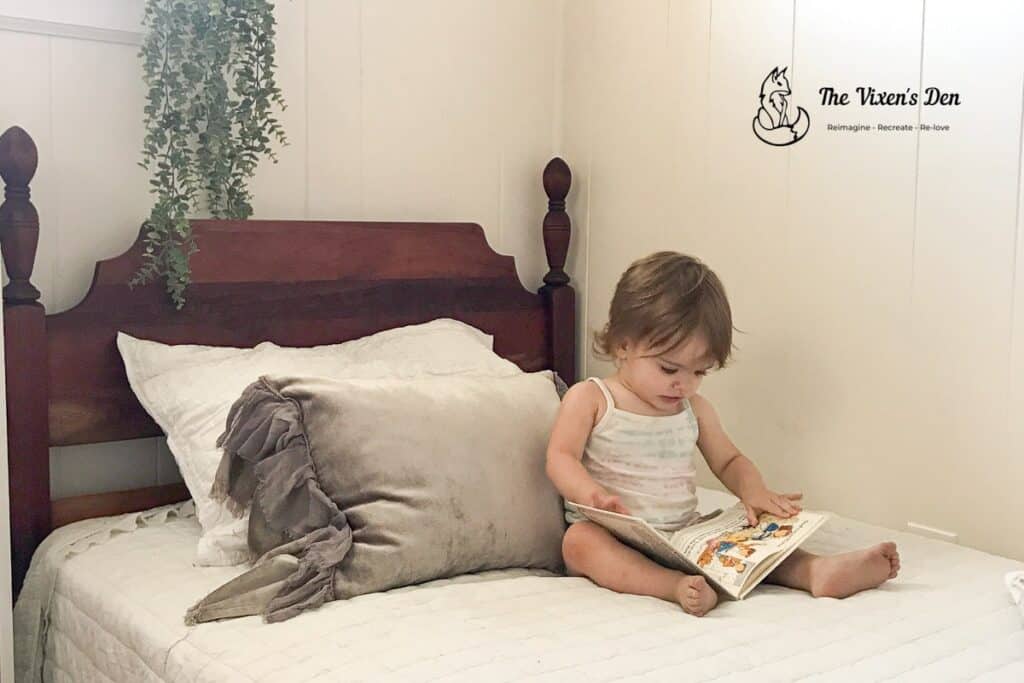
This headboard and footboard are just one of a pair. Together, they saw my mom and my aunt grow from little girls to teenagers. They watched my brother and I do the same. Then my daughter as she moved from her crib to her first night in this big girl bed, tucked under a pink ladybug quilt.
Along the way, they became a little too scratched and scuffed and dented.
So it was time to give these pieces a fresh start with a new story.
This post is sponsored by Dixie Belle Paint Company. While they provided some of the products for this project, all of the opinions are my own. Follow this affiliate link to see all of their amazing products!
THIS POST CONTAINS AFFILIATE LINKS TO PRODUCTS. IF YOU PURCHASE PRODUCTS THROUGH THESE LINKS, THEN I MAY RECEIVE A SMALL COMMISSION AT NO COST TO YOU.
I ONLY RECOMMEND PRODUCTS THAT I USE AND/OR HAVE RESEARCHED AND WOULD USE.
Tools and Materials
Tools
- Mouse sander
- Extension cord
- Workbench brush
Stencil or Stencil (similar)- Rag
Artists brush Chip brush - Disposable pie tin
Materials
- Sanding pads
- Emery cloth
- Tack cloth
- Stencil adhesive
Stain Hemp oil
Cleaning & Prepping
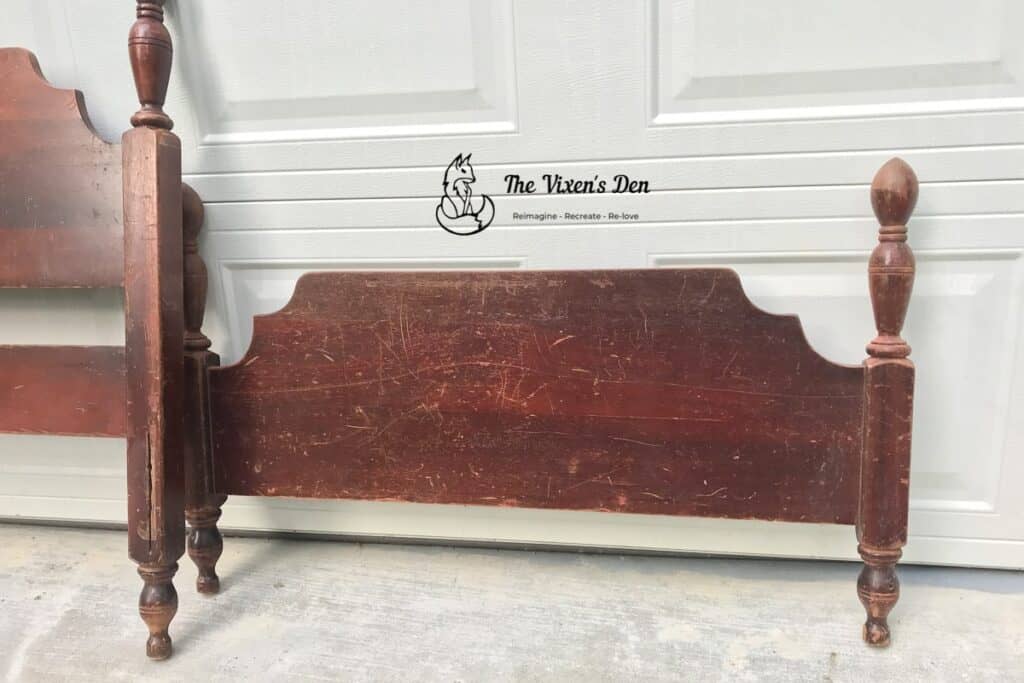
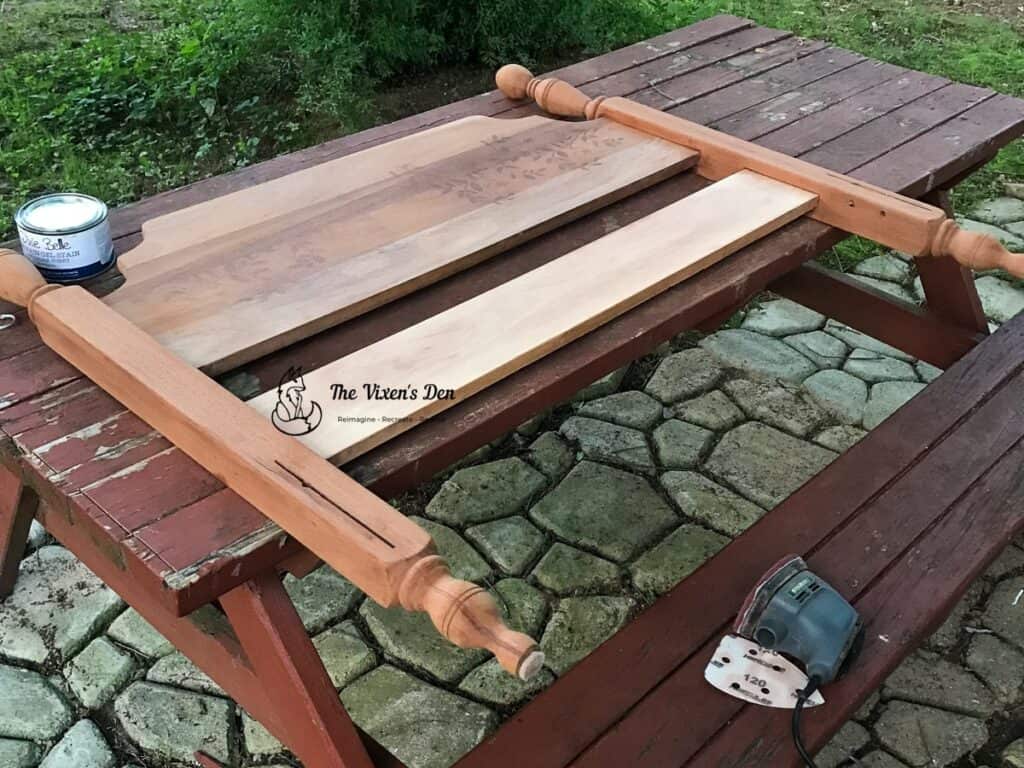
Normally, I prefer to strip the finish off of a piece of furniture and then give it a light sanding before adding the new finish. For this set, however, the scratches were deep and the old finish was so flaky, that I thought I’d try sanding it off instead.
It took far longer than I liked and soooo many sanding pads, but I think it was worth it. Sanding helped to achieve a smooth finish and revealed all of the beautiful wood grain that was hiding under the old stain.
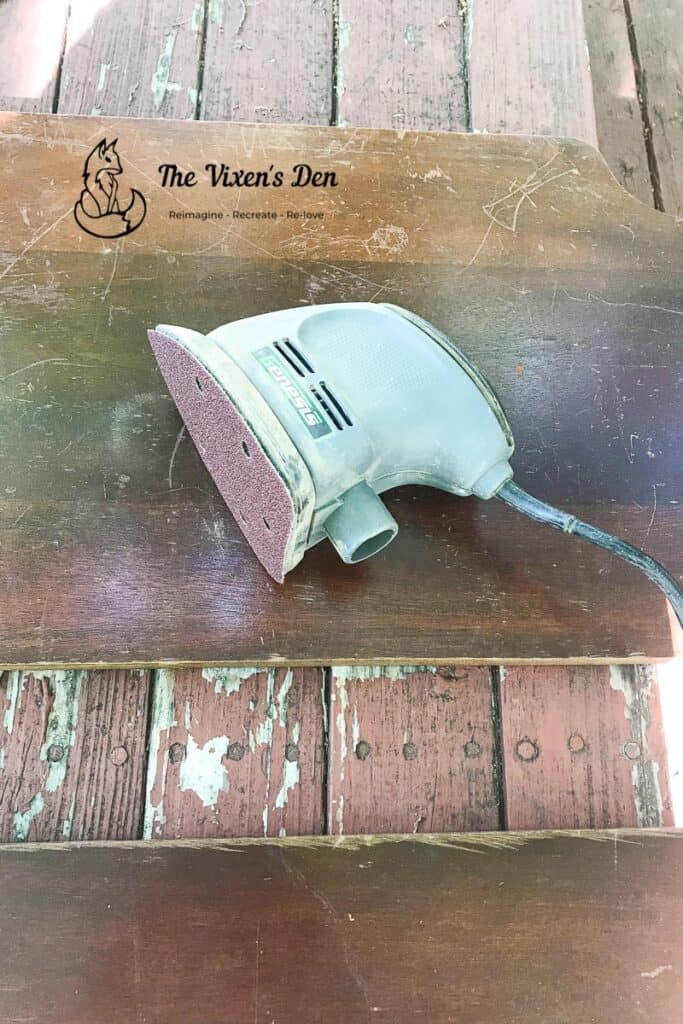
It took several sandings with the mouse sander starting at 40 and 80 grit to remove the surface finish. I whisked the sawdust off with my workbench brush and then swapped over to finer grits. I used 120 and 180 grit to remove the original stain before I finally made it all the way down to just the raw wood.
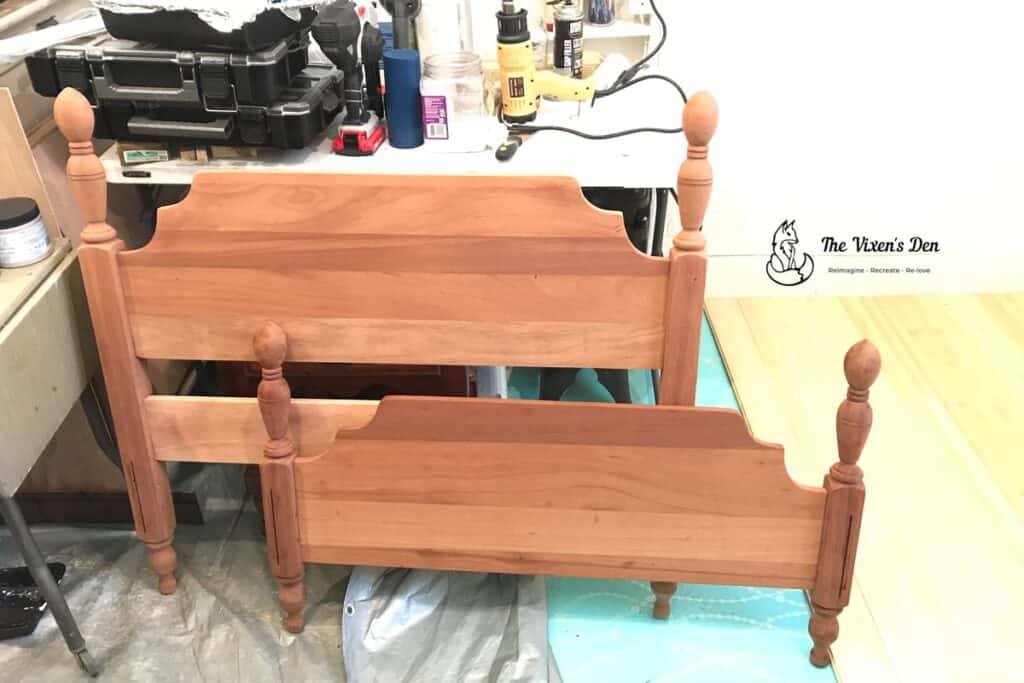
I used a strip of 80 grit emery cloth that I tore off and wrapped around the posts, just like dental floss. Holding it on each end, I gently sawed the emery cloth strip against the wood in order to retain the lovely rounded curves while I sanded off the old finish. It worked well, but I still think I’d like to invest in some cushy sanding pads to help with future projects.
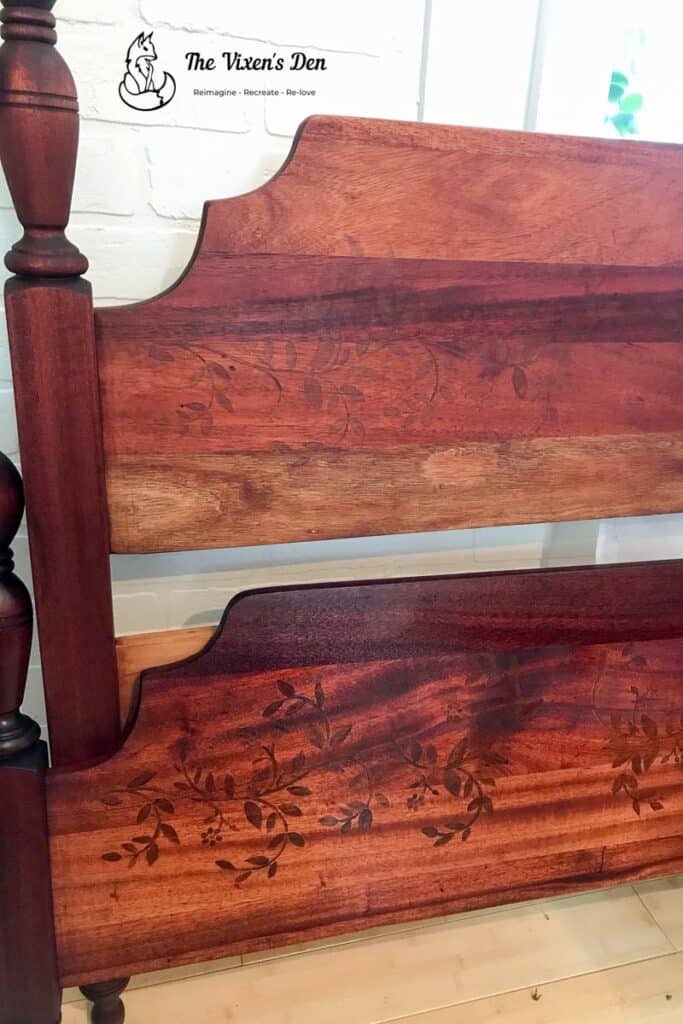
Staining with a Stencil
I really wanted to give this piece a little hint of something special. Something that would feel a little whimsical but fit in with any decor or stage of life. I settled on this sweet vine and leaf stencil that I used on my granddaughter’s crib.
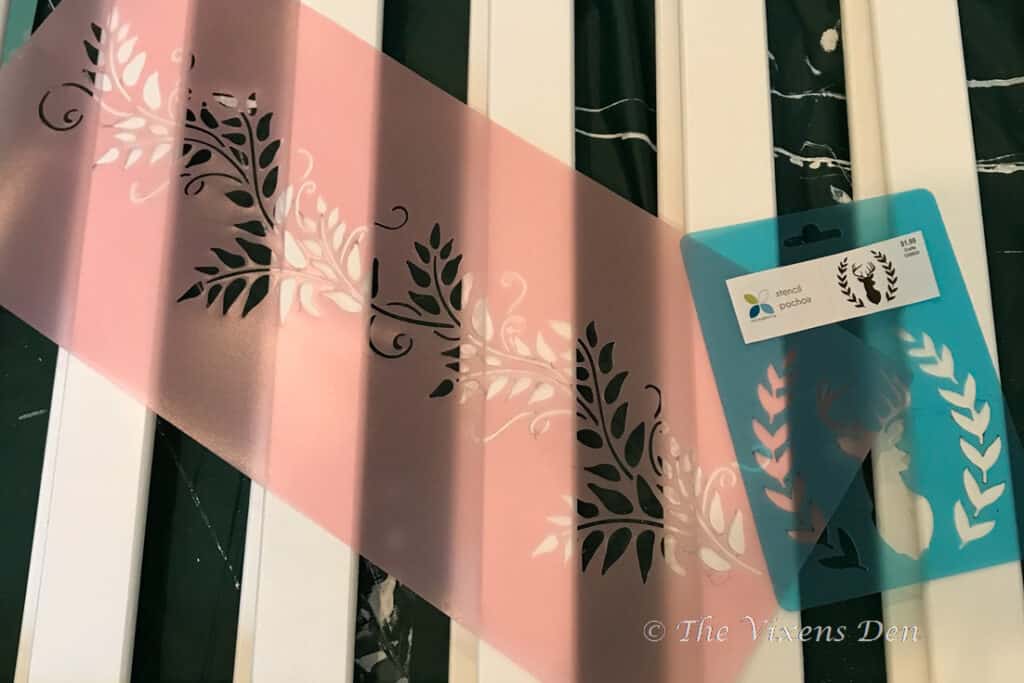
It’s a beautiful design that fits perfectly in any room!
I found that the new Dixie Belle American Honey No Pain Gel Stain had the perfect tones that matched up beautifully with the mahogany wood.

The design was set, the materials were ready, and everything was in place.
I applied the stencil adhesive to the back of the stencil, pressed it to the surface of the wood, and applied the gel stain with a rag. Then I peeled off the stencil.
And this is exactly where things started going a little bit sideways.
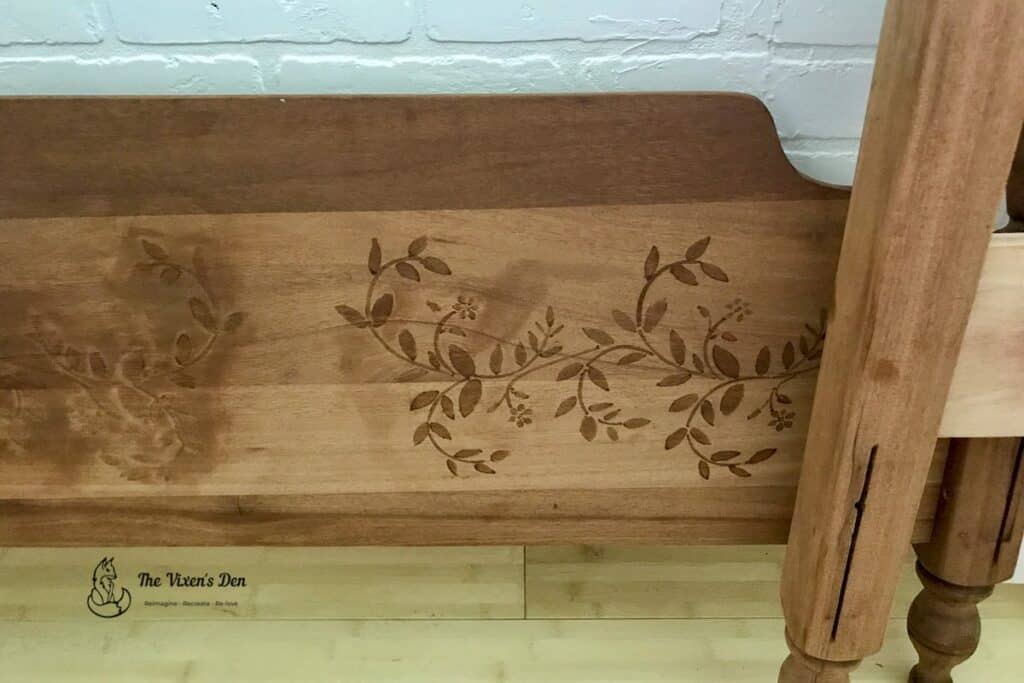
I’ve stained with stencils in the past, but this time, I just couldn’t seem to get the right amount of stencil adhesive applied. I over-sprayed at first, which ended up leaving a lot of residue on the raw wood. That was bad enough, but where things really started to get interesting was when I tried to remove the adhesive with mineral spirits.
I don’t recommend it.
So, after giving the oil a few days to dry, and finally realizing that it wasn’t going to happen, the pieces went back to the sanding table.
Interestingly enough, I was able to sand off the adhesive residue and the mineral spirits, while still leaving behind a little bit of the stencil outline.
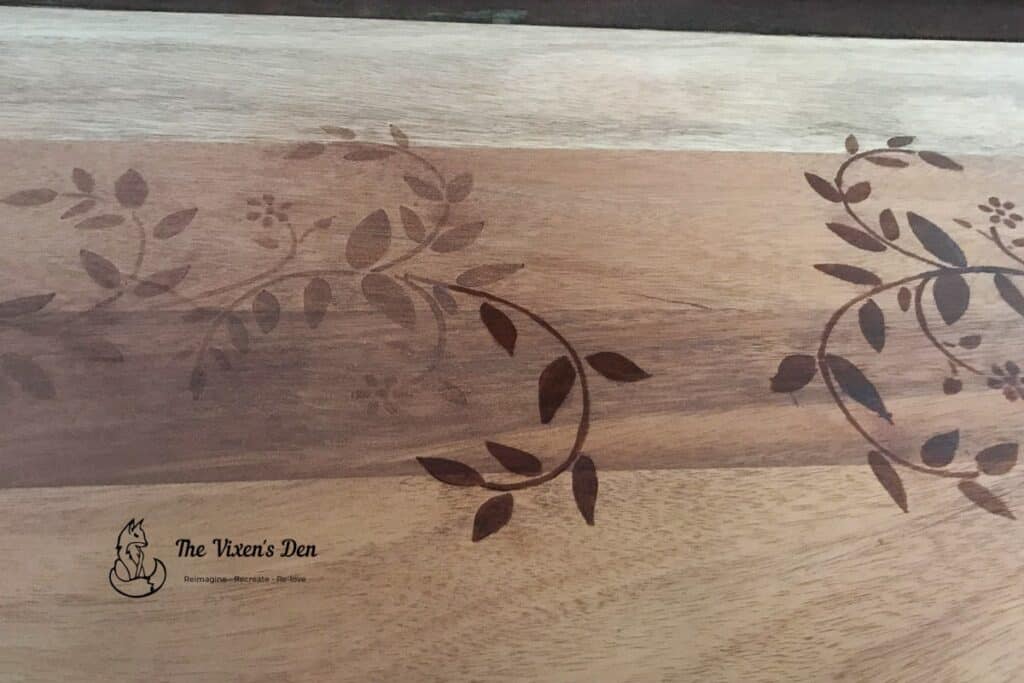
I decided to make good use of this by hand “painting” the stencil using an artist brush. It worked really well, because not only was I able to recover the design, but I was also able to fill in the usual stencil gaps.
The final design came out so beautifully! I was very pleased with the results and ready to move on to sealing it all in.
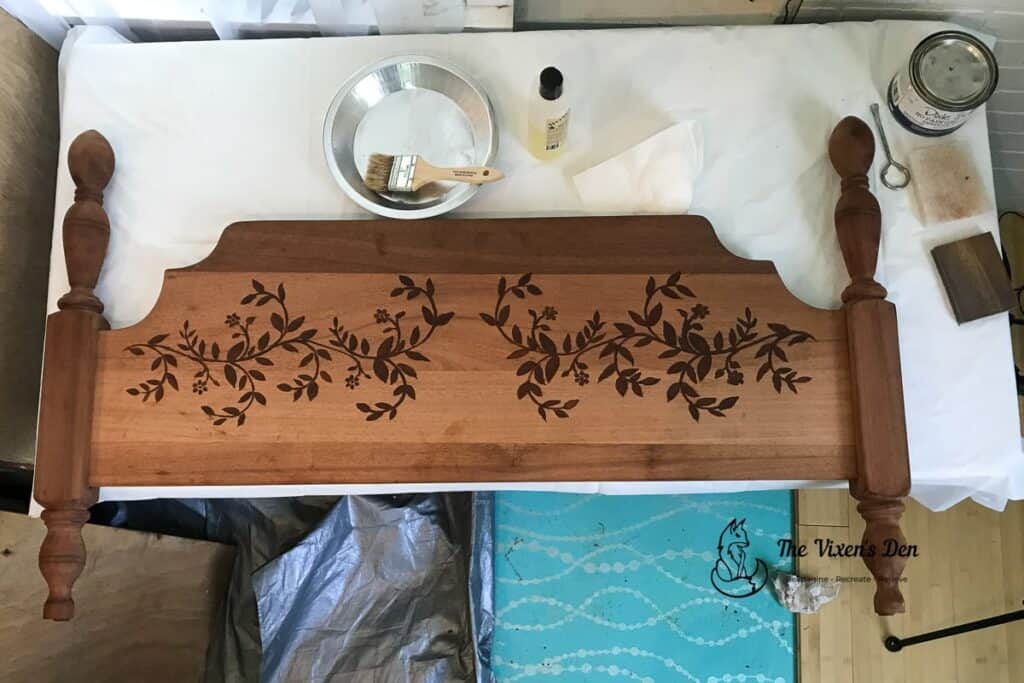
Sealing
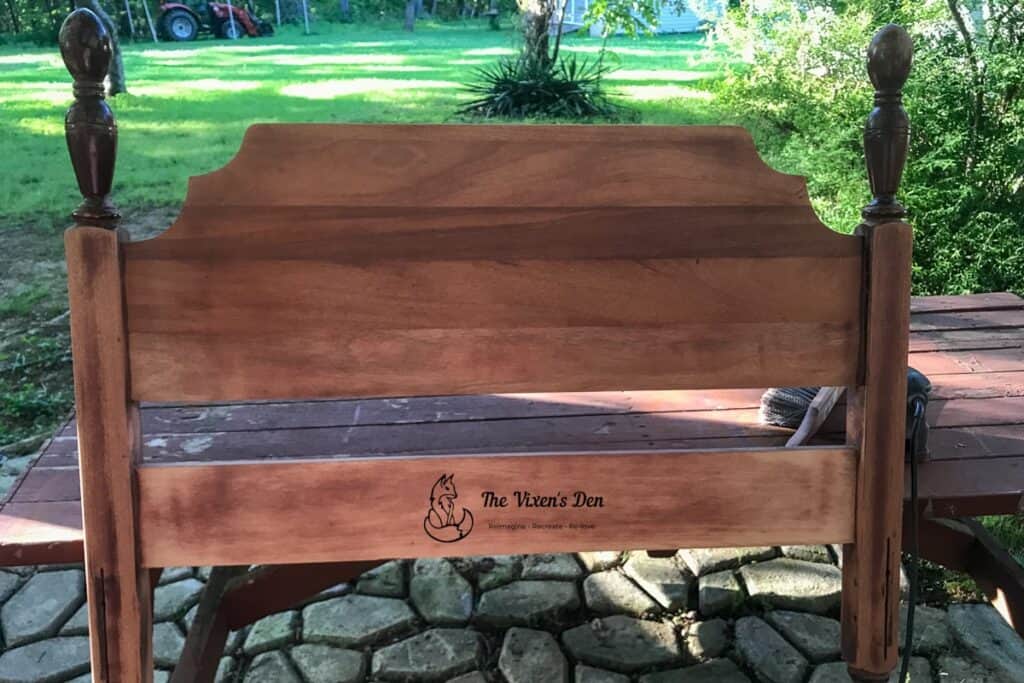
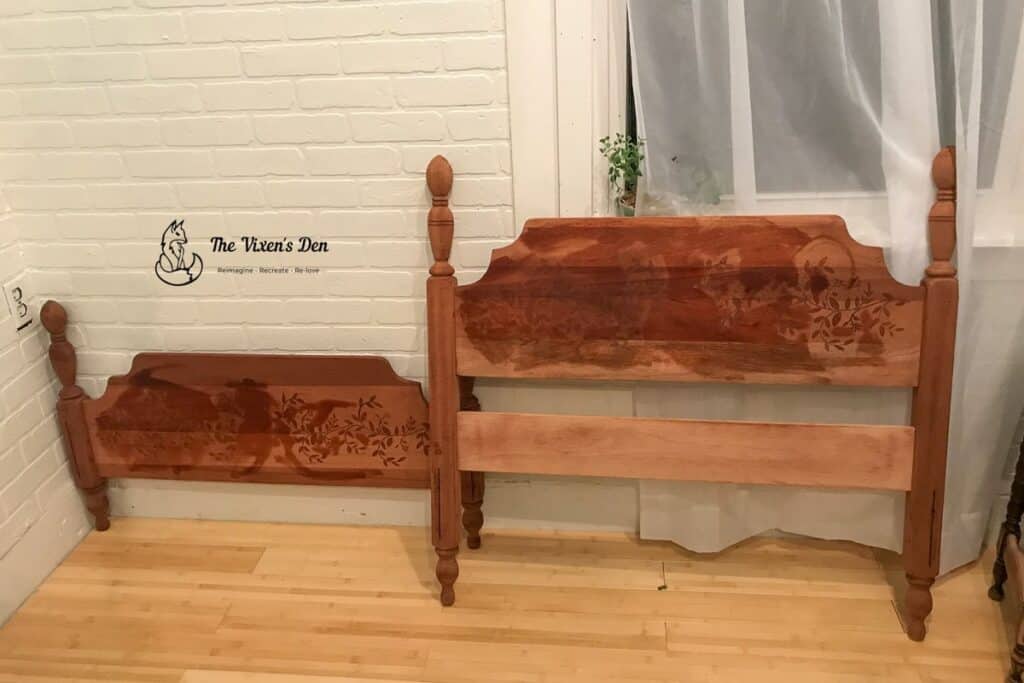
I recently used hemp oil to seal this ladderback chair, and I was pleased with the durable matte finish that it created. Hemp oil soaks into the wood, nourishing it while it also protects it. According to the instructions, after 21 days of cure time, the surface is even water resistant!
I was looking for something similar for this piece, so I was happy to pull out the chip brush and pie pan to see what magic the hemp oil would work on this old wood. When it came to bringing out the natural beauty of the wood tones, it didn’t disappoint!

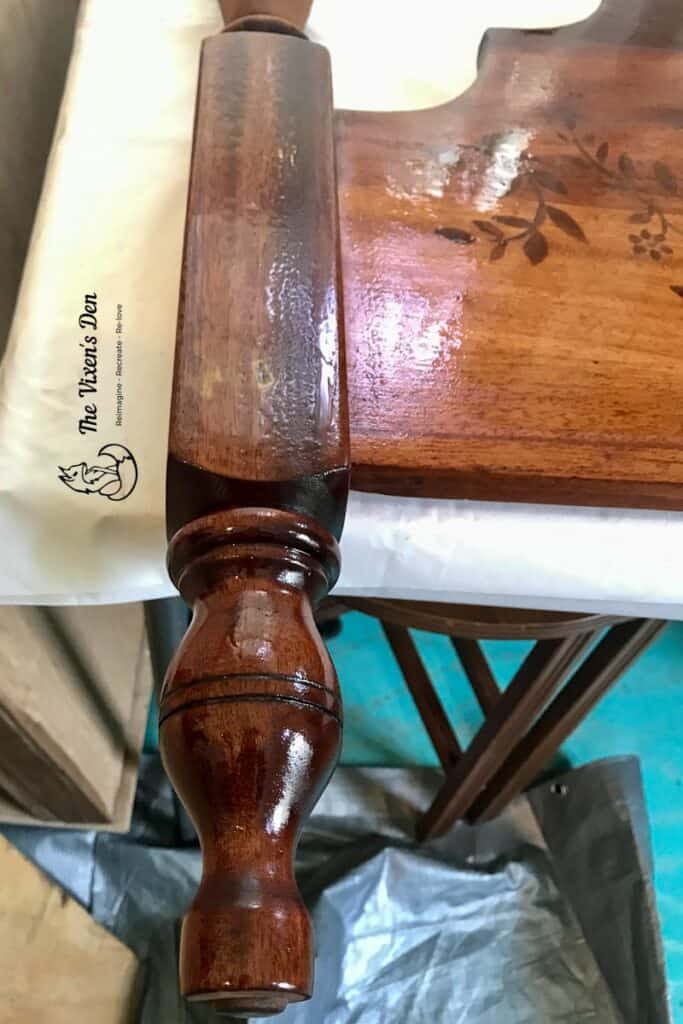
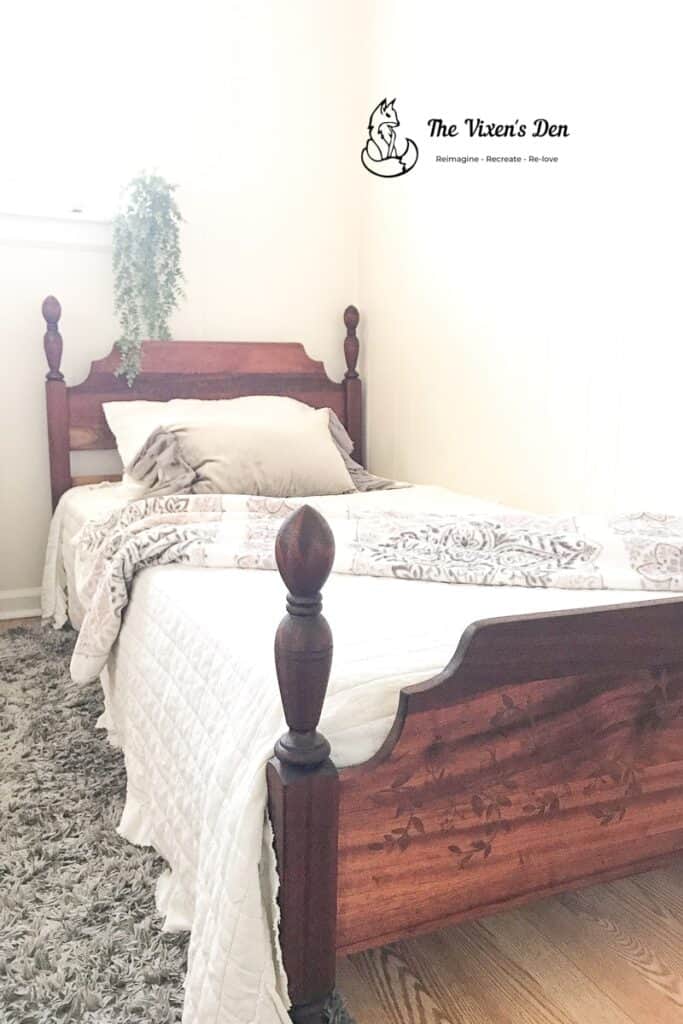
However, while the footboard turned out beautifully, the results on the headboard were not what I expected.
I’m still trying to figure out why it happened, but after applying the hemp oil to the headboard the stained stencil design became almost transparent. Do you have any idea why the hemp oil bleached out the stain on the headboard but not the footboard? I’d love for you to share with me in the comments below.
To say I was disappointed is an understatement. I was ready to start over…again…but my daughter said that she liked it that way. She was the customer, and so I left it.
Final Reveal
And here we are at the end. Finally! It wasn’t a terribly long post, but trust me when I say this was quite a bear of a project. However, the final result was worth it.

This wonderful piece of furniture has a new lease on life, with some very unique (perhaps a little more unique than I’d planned) details.

And now…now it’s watching over little blonde curls and blue eyes while she enjoys her evening storytime.
So there’s one of our furniture stories. What’s yours? I’d really love it if you’d share it in the comments below. I do love a good story.
Hindsight is 20/20
Here’s another kind of story. What were the lessons learned from this project?
- Don’t be afraid to start over. Even if it means starting over again and again until it’s right…or right enough to make the customer happy.
- Test materials and methods. I have a terrible track record of not doing this, and it really bit me on this project. If I had tested removing the adhesive with mineral oil on a scrap piece, I might not have had to sand as much.
- Wood is a unique material. The only way to create a uniform appearance is to paint it or stain it. As long as you embrace that from the beginning, and appreciate the unique characteristics that it brings, you’ll enjoy the project so much more.
- Heirlooms come in all shapes and sizes. This bed isn’t a particularly fancy or expensive piece of furniture, but the shared history is immeasurable. It’s a blessing to be able to bring new life and share this with a loved one.
Hopefully, some of these tips will help you on your next project. I know I’ve certainly learned a lot!
That’s all for now. Thank you so much for stopping by! Be sure to sign up below so that you don’t miss any of the misadventures. Until next time, have a beautiful and blessed day!


Don’t forget to sign up so you hear all about the next misadventure! Until then, you may also like this Magazine Rack makeover or this Dresser upcycle.
Thanks for sharing this technique and all the information and advice
I love this. It looks beautiful.
The headboard and footboard were better looking after they were cleaned and sanded. A simple coat of oil and wax and they would’ve looked perfect. The leaf decoration looks cheesy and crafty. All that’s missing is the dusty rose quilt.
Wow DH…that’s a bit harsh don’t you think..?!
Everyone has their own sense of style and creativity. It’s OK if you don’t “love” every project you look at…that’s to be expected since people are so different but, recognize that what works for you, may or may not work for others. The point is that the author posted the project, written with all of the challenges (and frustration) and lessons learned to HELP people with their own projects and you disrespect her by sharing your derisive comments. If you feel that strongly about the project then don’t comment. Try keeping the derogatory comments to yourself rather than sharing/spreading the poison.
Such a great post, Becky! Wood can be super tricky sometimes because it’s so porous and you never really know how all the different layers of stains, oils, and adhesives are going to react to each other. I love how you shared it’s ok to start over because that’s how you truly learn. I know it was a beast but I’m excited about the way it came together. You did a great job! Hugs, CoCo
This one was a challenge, but it turned out exactly how my daughter hoped it would. Thank you so much for stopping by, Coco!